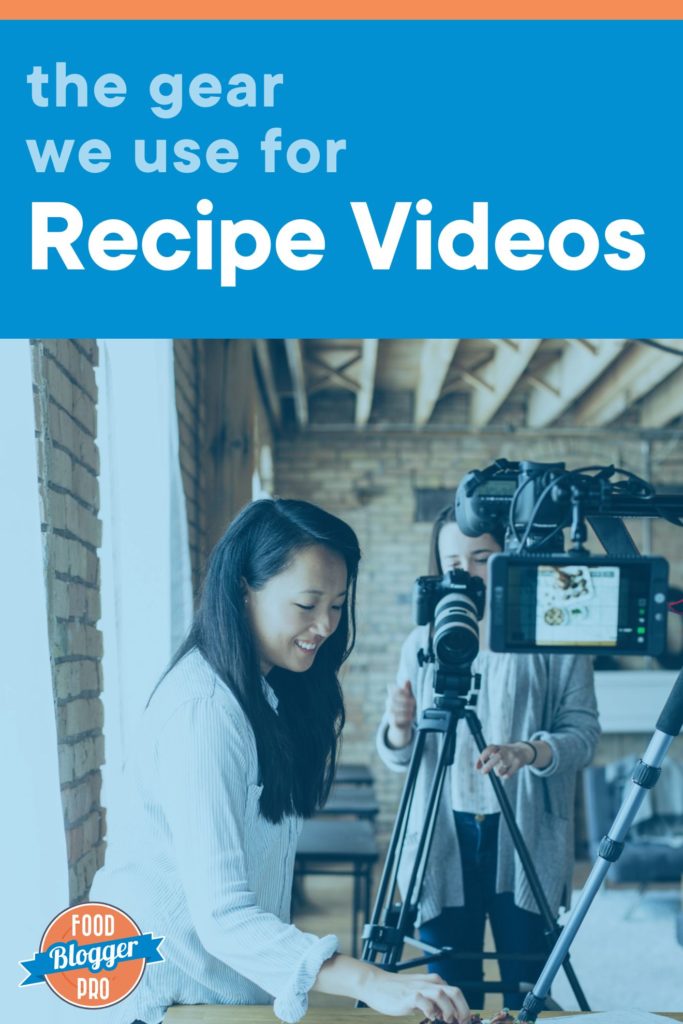
Filming recipe videos is a great way to visually show your readers and followers how to make a recipe. Videos are also incredibly popular on almost every social media platform.
Maybe you’re already filming recipe videos and just want to up your game, or maybe you’re a recipe video newbie looking for the best camera for cooking videos. Either way, we’re here to help!
We are going to take a deep dive into the gear that our sister site and food blog, Pinch of Yum, uses for recipe videos – from cameras and tripods to editing software.
Want to learn more about recipe video equipment?While filming and editing videos is undeniably more work than shooting and editing still photos, videos are so versatile! You can share versions of your video footage across platforms – including Instagram Reels, TikTok, Pinterest, Facebook, YouTube, Twitter, AND on your food blog!
Let’s start with a list of what Pinch of Yum currently uses, some basic examples of how we use it, as well as some other common video-related questions that we’ve seen on the Food Blogger Pro community forum recently.
We’ll cover:
- Equipment for Shooting DSLR Recipe Videos
- Equipment for Shooting iPhone Recipe Videos
- Editing Software for Recipe Videos
- Recipe Videos FAQ
Equipment for Shooting DSLR Recipe Videos
Canon 7D Mark II
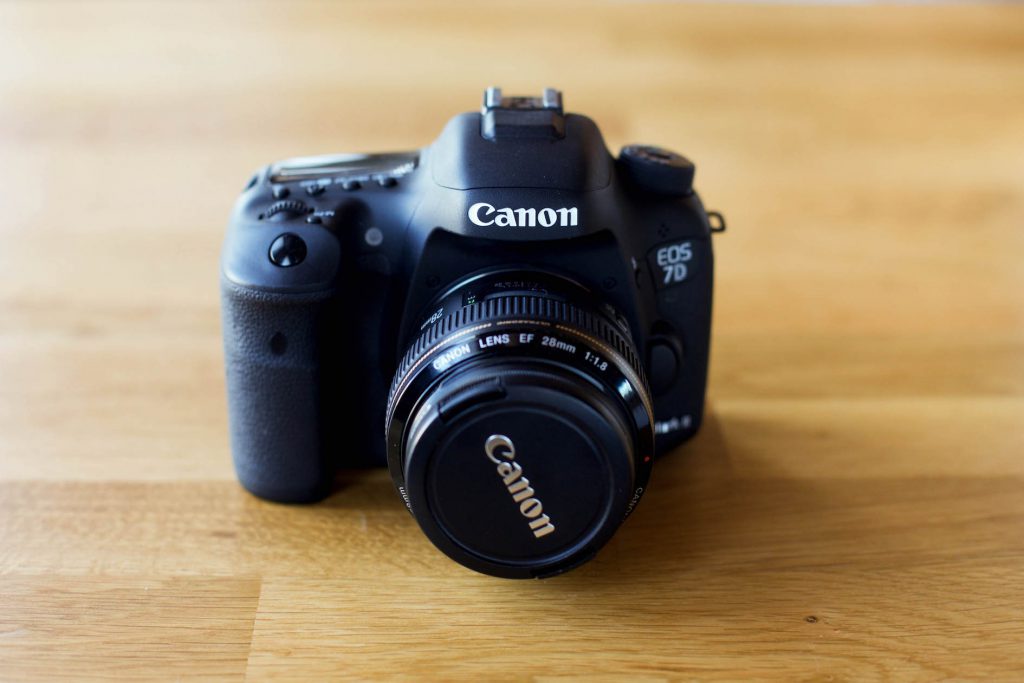
We use a Canon 7D to shoot almost all of the side-angle videos you see on Pinch of Yum’s website, Facebook, Instagram, TikTok, and YouTube channel. If we had to choose, we would nominate this camera as the best camera for cooking videos! That said, we will occasionally use an iPhone when we don’t have the 7D readily available (more on that in a bit). We shoot our videos at 24fps because it gives the video more of a cinematic or “Hollywood-like” feel to it. 30fps or 60fps would feel a bit more digital. In fact, 60fps is reserved for capturing really fast motion, or for creating a dramatic look that might feel out of place for a typical recipe video.
Canon 5D Mark IV with Lens: Canon EF 24-105 IS USM
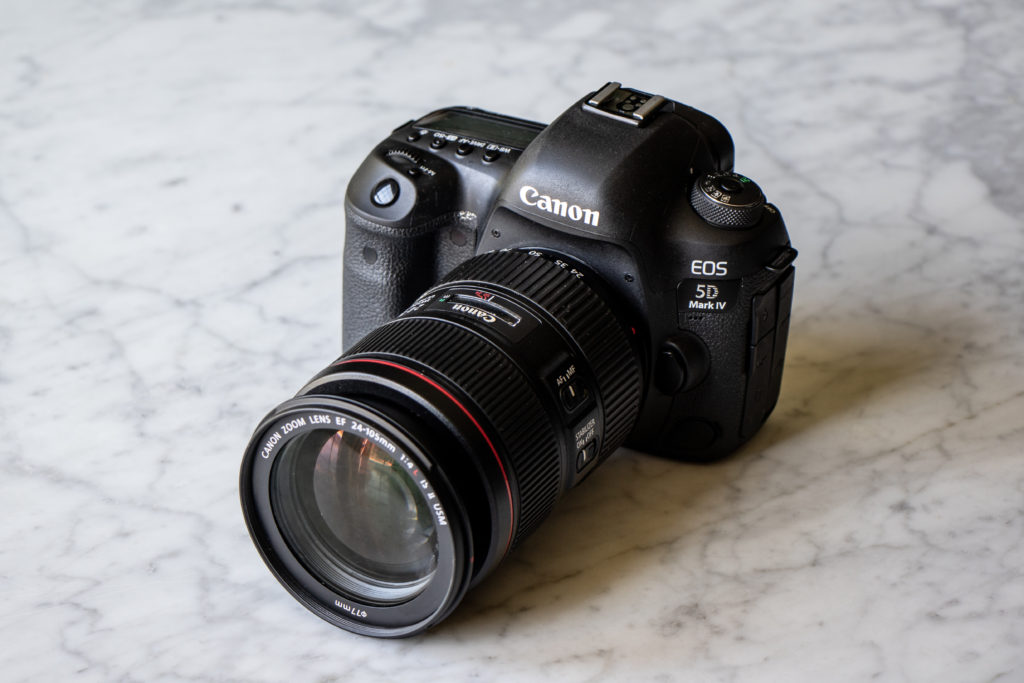
We use this camera when shooting overhead cooking videos for Pinch of Yum. We like having the zoom lens to be able to change the cropping and composition without moving the camera and/or tripod.
Canon 80D
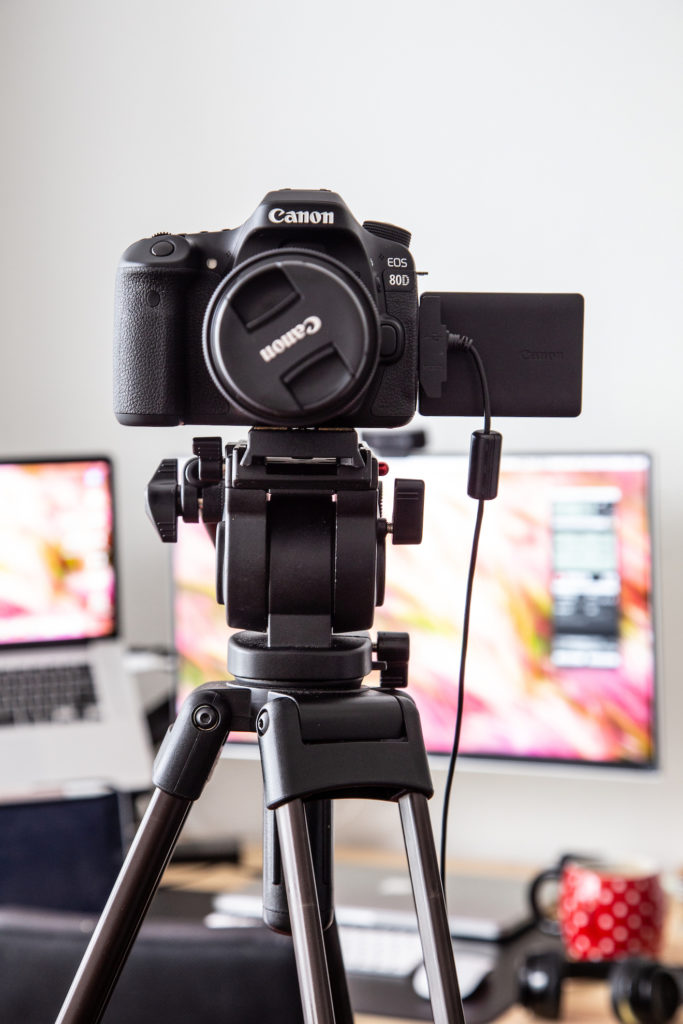
If you’re using two cameras to shoot your recipe videos and want a cheaper option than a second Canon 7D, the 80D is very similar at a slightly lower price point. We use this camera for our side-angle shots when we really want to highlight the detail of the recipe — think: stringy cheese, melty butter, sandwich cross-sections, etc. The 80D is nice because it has a swivel screen that can help you keep an eye on what you’re filming no matter where you are.
Canon EF-S 18-135mm f/3.5-5
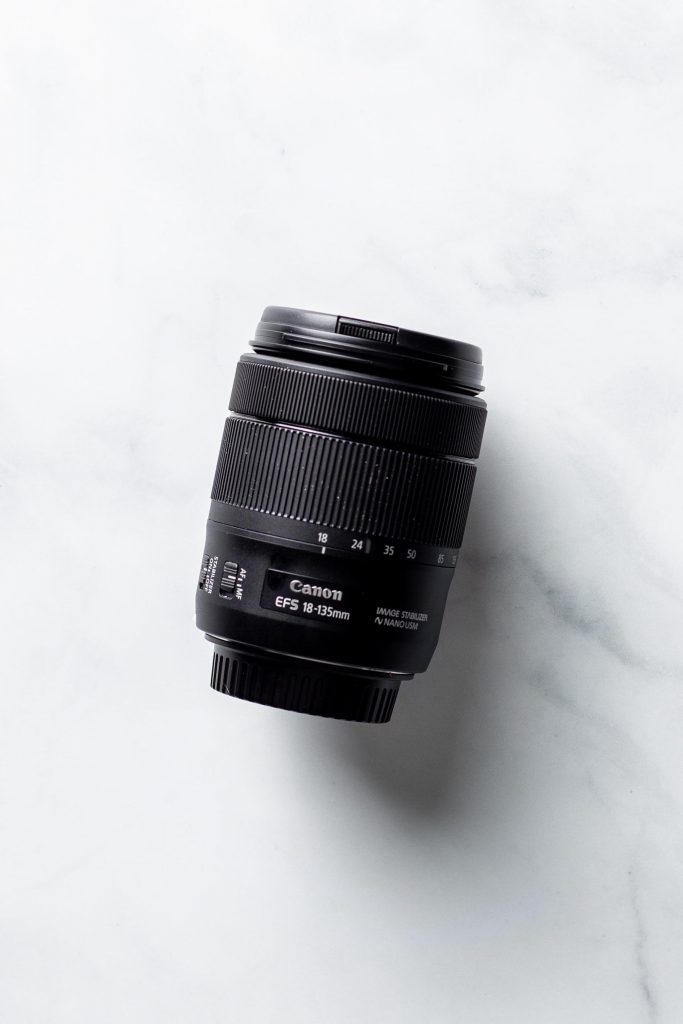
This is the lens we use for wide, overhead shots, and it works really well for close-ups too. It’s not a prime lens, which means that you can zoom in with the lens itself, rather than zooming in during post-production.
Canon EF-S 55-250mm f/4-5.6
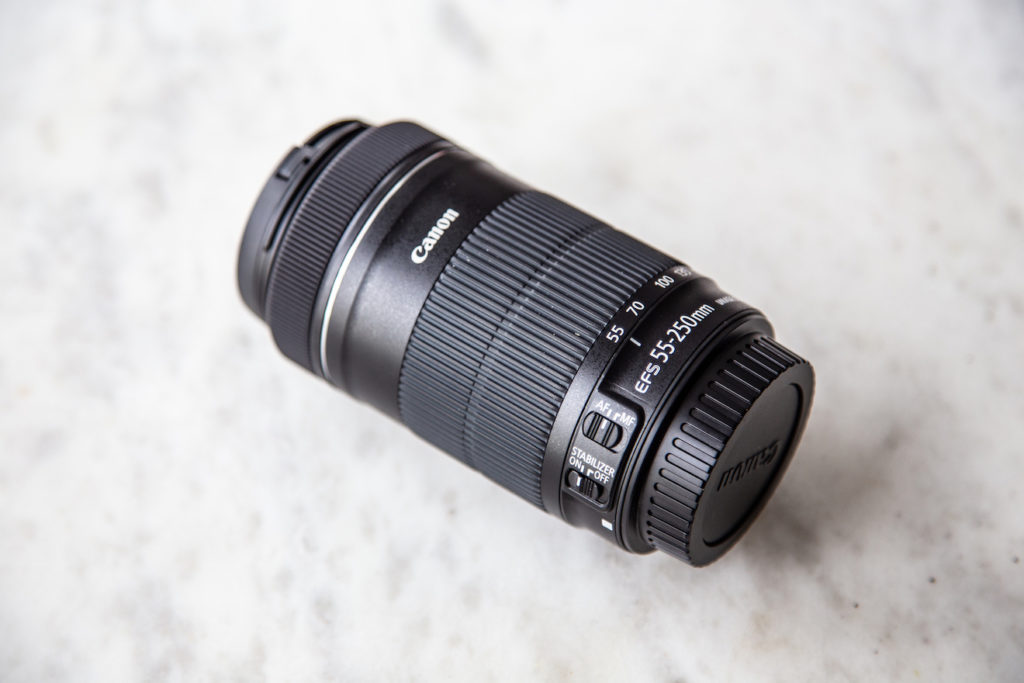
We use the Canon 55-250mm lens with the Canon 7D Mark II for our side-angle shots. It’s a more budget-friendly zoom lens for those close-up detail and texture shots.
SanDisk Extreme Pro or Lexar Professional Memory Cards
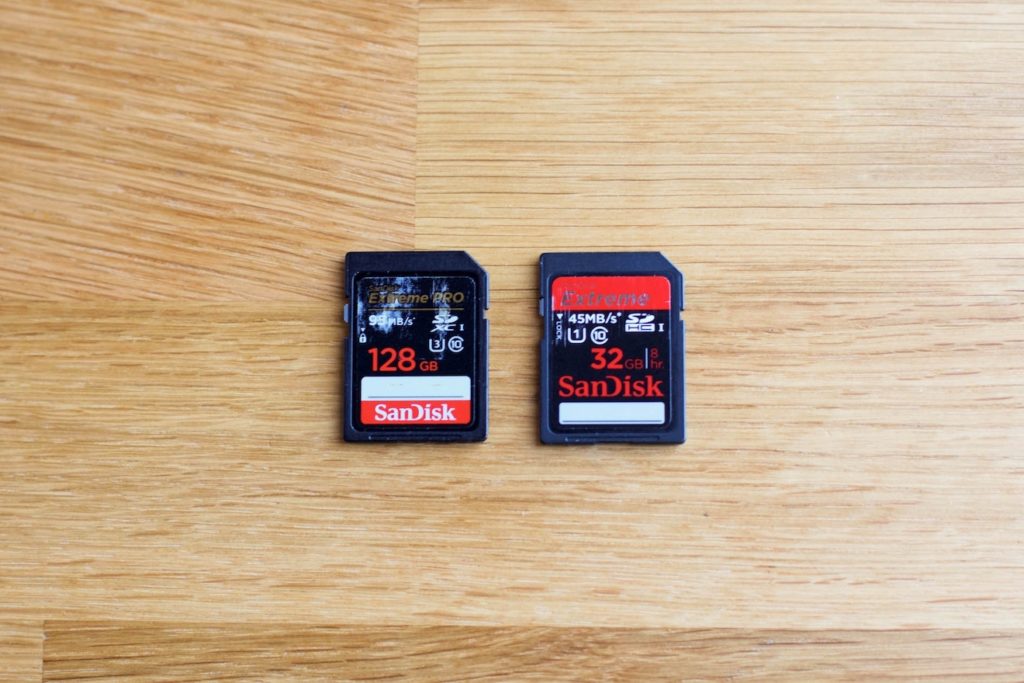
You’re going to want a memory card that can handle the speed and size of your footage if you’re shooting on a DSLR. In terms of space, we would recommend something above 64 GB (we use a 128 GB card). However, you could probably get away with 32 GB depending on how long the videos are that you are creating. Look for U3 Class 10 cards from professional brands like SanDisk or Lexar.
Impact C-Stand with Sliding Leg Kit (Black 11′) and Camera Mount
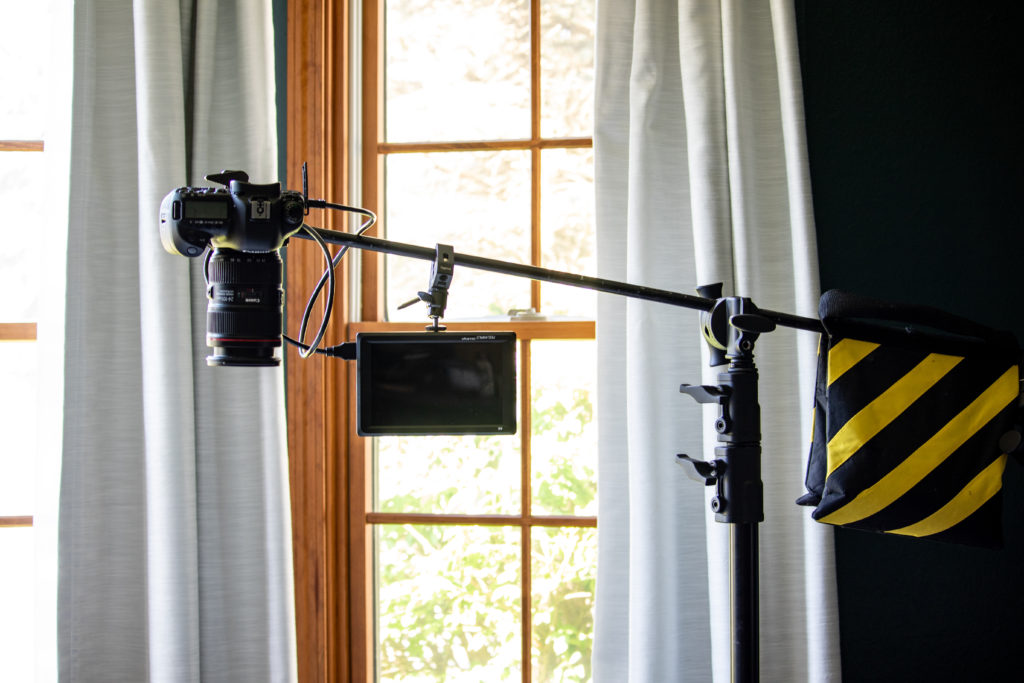
We have two of these stands: one that we use for the overhead camera and one for the side angle. For the overhead, we stabilize the arm with a sandbag on the other end.
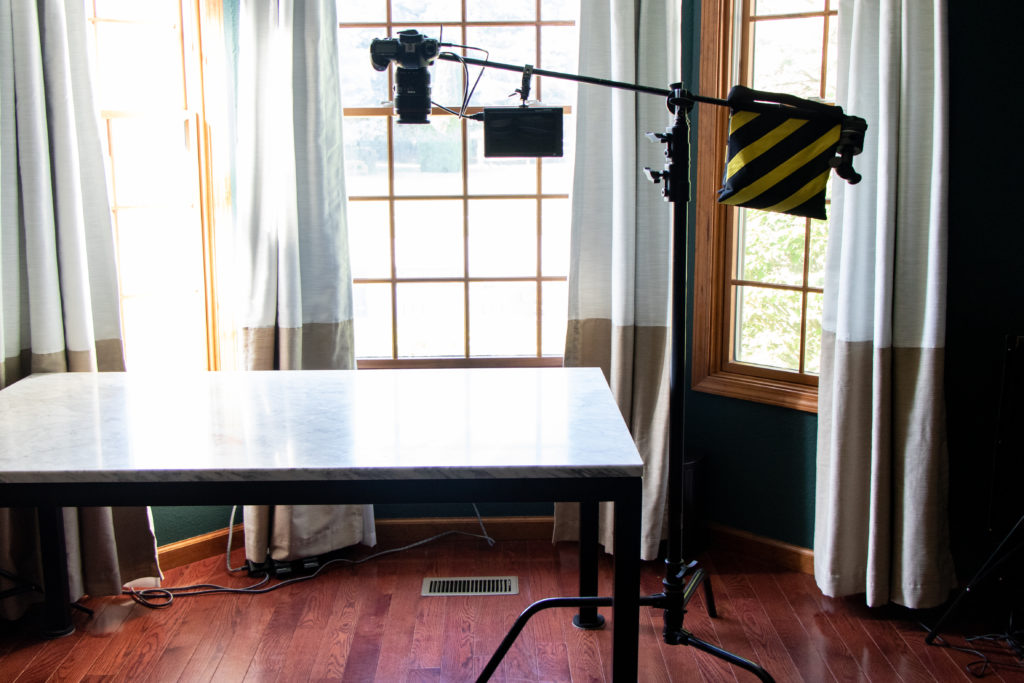
We like the versatility of these stands because they can be used for many things in the studio beyond just holding the cameras. This stand is pretty large, so keep that in mind if you’re working in a smaller space!
You will also need to purchase a camera mount for these stands to attach your camera to them. We use Manfrotto mounts because they are interchangeable with the quick-release plates.
Manfrotto Ball Heads with Quick Release Plates and Manfrotto 014-14 Rapid Adapter – 5/8″ Stud to 1/4-20″ Thread
If you decide to go with the Impact C-Stand, you need to purchase a tripod head to attach to the C-Stand.
Make sure that whatever mount you purchase is rated to hold the weight of your camera (some are light-duty and will not hold a heavy DSLR and lens firmly).
Lastly, you will need the Manfrotto Rapid Adapter to attach the tripod head to the C-Stand.
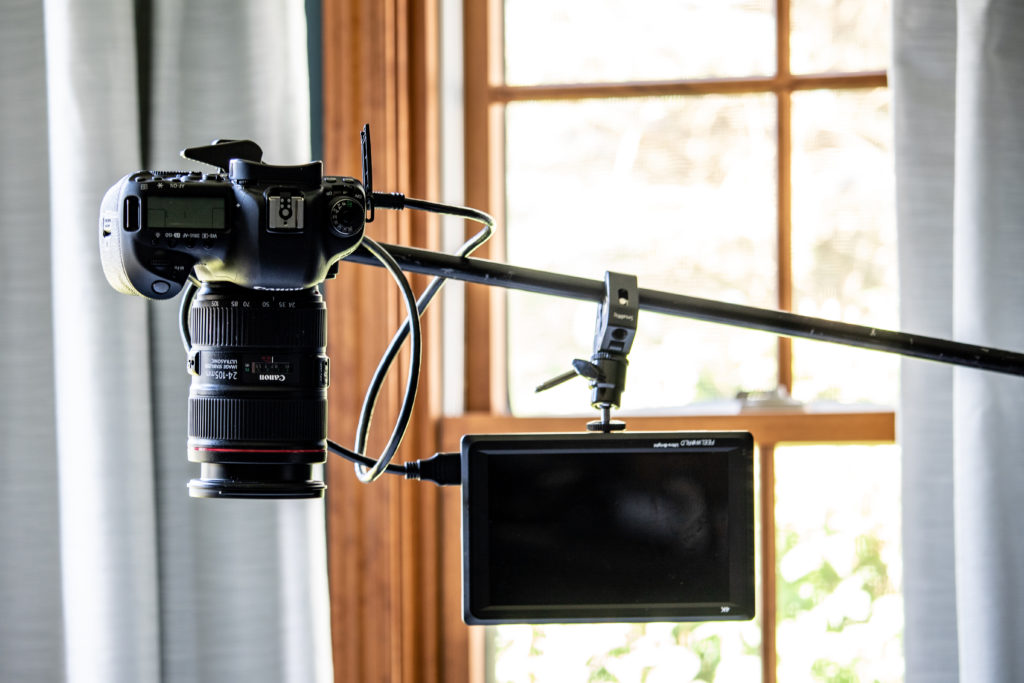
FeelWorld 7″4K Ultra-Bright Monitor with Loop-Through HDMI
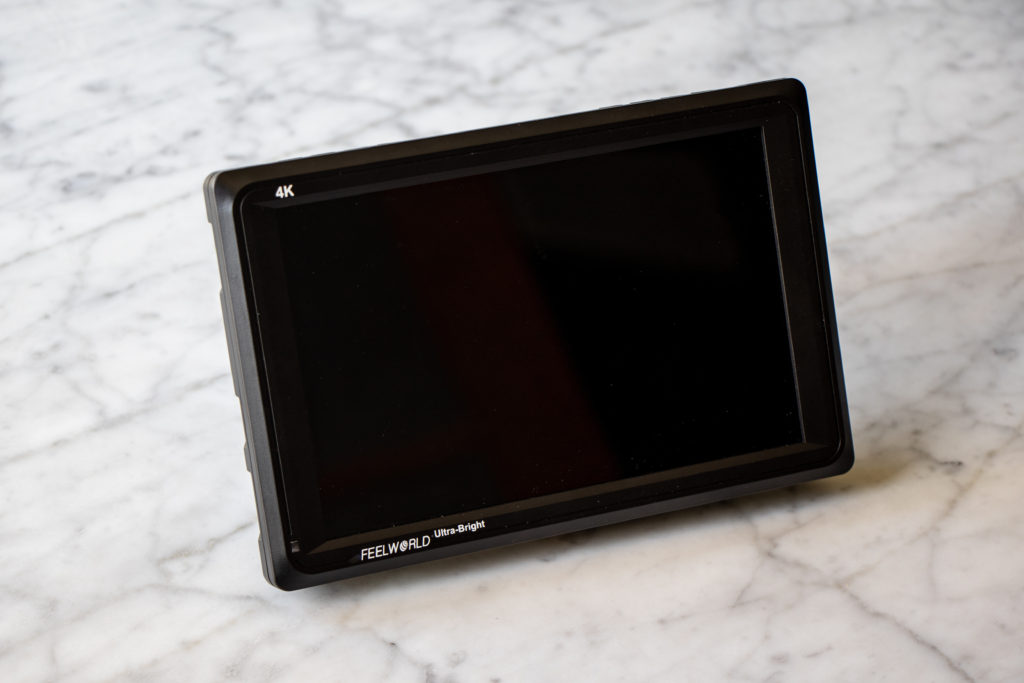
Top-down videos are great, but it’s sometimes difficult to see if your food is centered in the frame, in focus, or overexposed because of the angle of the camera. That’s where a monitor comes in. We have two of these monitors that we attach to our two DSLR cameras so that we can see what’s being captured in the shot.
Westcott Flex Light, NEEWER LED Video Light and Stand Kit or Amazon Basics Portable Photo Studio
We use natural light whenever we can, but sometimes the weather just doesn’t cooperate. We’ve used all three of these options for artificially lit photography, and they work great for video too.
The Westcott option is the most expensive option, but the NEEWER lights are a great alternative. The NEEWER lights are smaller, easy to store, and come with a dimming option if you want a warmer light.
Lastly, the Amazon Basics Portable Foldable Photo Studio Box is an easy and affordable choice for artificial lighting!
Ready to learn more about artificial lighting?Extras
Here are some additional, smaller items that will make your filming process a lot easier:
- HDMI to Mini HDMI Cord: If you’re using a monitor when filming, you’ll need a cord so you can connect that monitor to your camera. Based on the cameras and monitors we use, this is the cord we need. Be sure to check your specific cameras and monitors to figure out what kind of cord you need.
- Canon EOS Utility: Since we shoot with Canon cameras, we use a free (!) program called EOS Utility to tether our side-angle camera to a computer monitor. We can see what our camera is recording and adjust our camera settings directly from this program.
- USB to 5-Pin Mini-USB Cable: This is the cord we use to tether our camera to our computer monitor.
- White Balance Cards: We use white balance cards to set custom white balance before a shoot. They help with the overall “look” of the final video.
- Bounce Cards: Just like in photography, we use bounce cards to lighten up some dark areas in our shoots. We don’t use them all the time; instead, we use them as needed if the lighting is subpar. We use the foam core boards from craft or office supply stores!
- Diffusers: You know that beautiful, soft light you see in really awesome photographs? You want that same quality of light for your videos! You can use diffusers built specifically for photography, or you can find a sheer curtain that you can hang in your window.
- Google Drive: We use Google Drive to help us organize and collaborate on our videos. It’s part of Google Workspace from Google.
- My Passport for Mac Portable External Hard Drive: Video files are big, so a big external hard drive is great for organizing, storing, and protecting your clips.
Equipment for Shooting iPhone Recipe Videos
iPhone
It is increasingly common to see recipe videos filmed on a phone on social media. This popular Reel from Pinch of Yum was filmed on a phone! Smartphones can be a great way to start shooting recipe videos if you’re not quite ready to jump into DSLR videos. Plus, shooting a smartphone recipe video is as simple as hitting record on your camera app!
You can also use an iPhone to capture audio, as the audio recording capabilities of DSLR cameras is really bad.
Overhead Pro Tripod
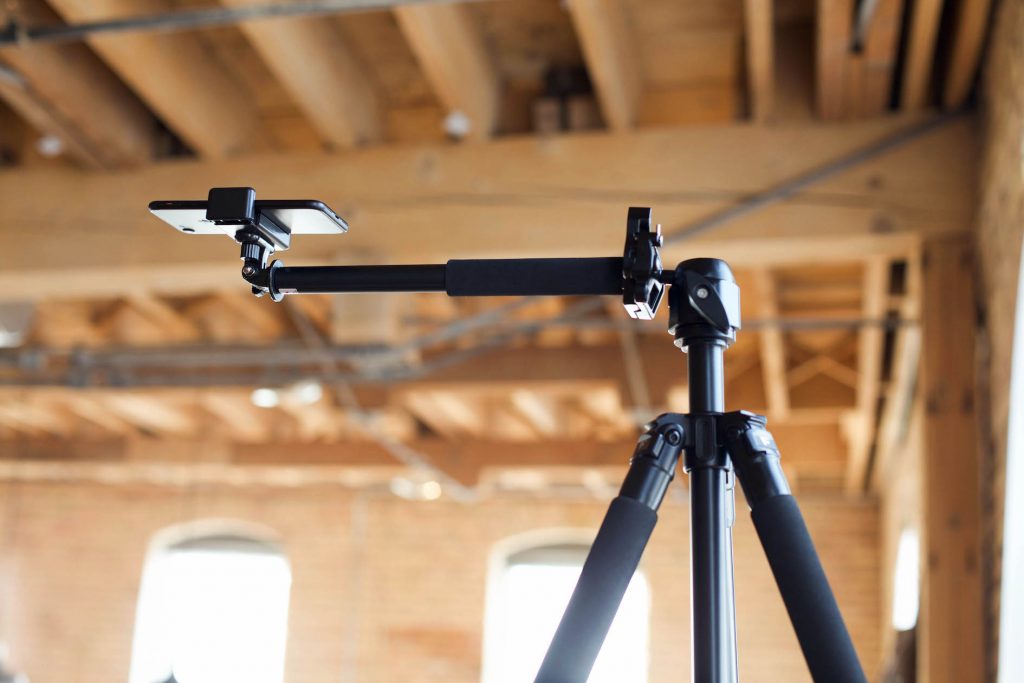
We really like using the Overhead Pro Tripod for iPhone videos. The nice thing about this tripod is that it has an arm. Since the camera is far away from the legs of the tripod, you’re not getting the legs in your shot. A smartphone is light enough that this very small tripod can support it, so it’s a great economical option.
Reflector 4
Just like the monitor for DSLR videos, we use Reflector 4 so that we can see what the phone is recording without having to look at the phone screen itself. It hooks up wirelessly and broadcasts your phone video onto your tablet or computer.
Zoom H4N Digital Recorder
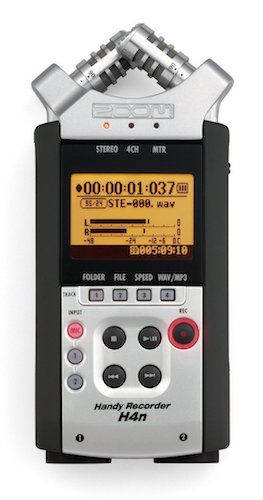
We used the Zoom H4N audio recorder for the Food Photography Lighting and Putting it All Together courses on Food Blogger Pro along with a clip-on mic. It’s a great mic for picking up the audio in a room, but it’s not quite as good as using a clip-on microphone like the one below.
Sennheiser EW 100 ENG G3
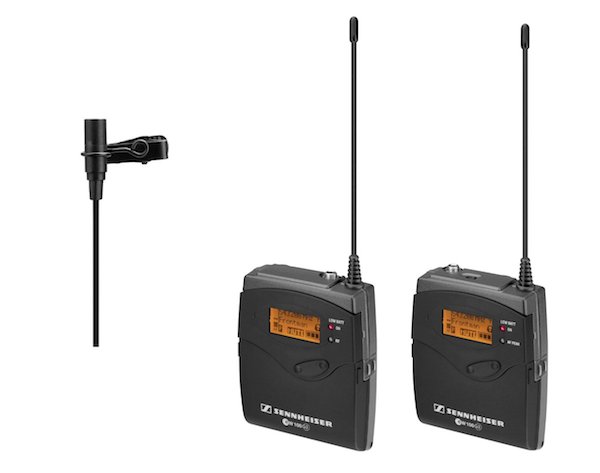
We have two of these mics. This mic was recommended to us by a video production company as the best of the “prosumer” level mics. In other words, it’s the best mic you can get without having to spend a crazy amount of money for a professional mic.
That being said, it’s still a really expensive mic. We’d advise you to only purchase this if you’re really going to dive deep into video. The Zoom H4N is a much more affordable option if you’re just getting started.
Editing Software for Recipe Videos
Final Cut Pro X
When FCPX first came out, there was a lot of pushback from the video editing community because the software looked and acted a lot like iMovie, which was great for beginners but frustrating for pro-level editors. Apple has significantly improved the software since then, and it’s now an awesome prosumer-level software. It’s not quite 100% professional, yet it’s not quite 100% consumer.
At Pinch of Yum, we use Final Cut Pro X to edit our food videos. One of our favorite features is Synchronize Clips. We use this feature to quickly and easily sync up the audio and video clips from the shoot.
Learn everything you need to know about Final Cut Pro X.Adobe Premiere Pro
If you’re already using Adobe Lightroom and/or Adobe Photoshop for your food photography, you might want to add another Adobe product to your workflow. Premiere Pro gives you a lot of control in terms of the final video, and is also great for those who are working on Windows computers – Final Cut Pro X and iMovie (below) are both only for Macs.
Ready for a deep dive into this software?iMovie
You can use iMovie on a desktop or on an iPhone, so it’s a great solution for those who want to try their hand at phone videography. It has a few more limitations than Final Cut Pro X or Premiere Pro, but it’s a good solution for just starting out with video editing.
Want to learn more about editing in iMovie?InShot Pro
We like to use InShot to edit videos on our phone (like for Instagram Reels and TikTok). It is easy to record the videos using your iPhone, edit with the InShot app, and then upload the final video to whichever social media platform you prefer.
While there is a free version of InShot, InShot Pro allows you to download your videos without the InShot watermark.
Recipe Videos FAQ
But wait, there’s more! Here are some of the most common questions we get about how we shoot recipe videos, along with some quick answers to get you started:
At Pinch of Yum, we love using natural light for our recipe videos. The gorgeous, soft lighting matches the food photography style on the blog. Plus, it’s free!
When filming with natural light, find a location where the light is even for the longest period of time. A north-facing window is usually a great location to shoot. When filming video, you are typically working over a longer period of time than you are when shooting still images. During that increased filming time, natural light can shift and change with the time of day and weather. Be sure to monitor the light as you film and adjust your white balance and fill cards accordingly.
Artificial lighting is also a great option. It provides an even, consistent light and light temperature that you can turn on any time of the day. That being said, artificial light can be a costly option, particularly if you are hoping to replicate the true beauty of natural light. Depending on the size of your work space, working with artificial lights can also be bulky and cumbersome to work with and store.
Keep in mind that you’ll share the video across your social media platforms before, during, and after shooting to make sure frames are composed so that several different crops will work. Head over to our Definitive Guide to Video Sizes for Social Media post for more details on dimensions and video duration.
Consider a slightly different edit for different platforms. For example, for Reels and TikTok, a shorter, snappier video that features more of the finished product will usually perform better than a longer, instructional video.
The same footage can be used on each platform, just rearranged, sped up, or slowed down. You might also choose different music for each platform to appeal to that specific audience.
A great Reel or TikTok has some text, but not too much that it becomes tedious to watch. For recipes that have a complicated step, consider focusing more time of the video on that step, while also providing tips for the viewers with text.
Overhead style recipe videos are a fun and popular way to share recipes. They are characterized by quick, overhead video footage demonstrating a recipe, typically set to fun music or narrated.
Here are some tips for making your own overhead recipe videos:
Overhead Angle – Whether you are using a DSLR camera or your phone, you will need a tripod that has the ability to hold your camera horizontally over your work surface while you film to achieve the overhead angle.
Close-up/Side Angle – While this style of recipe video sticks mostly with overhead angles, there are often occasional close-ups or side angles to break up the overhead footage. These angles can be shot with a second camera set off to the side or simply by moving your first camera down or zooming in during certain points of the recipe process.
Speed – There are a variety of platforms on which to share your recipe videos, and some have limits to the length of the video. Consider speeding up your video to keep a snappy feel and move the viewer through the recipe without focusing on some of the longer, more monotonous steps.
At Pinch of Yum, we love using DSLR cameras for shooting cooking videos. If you are looking to purchase a new camera, here are some things to consider:
Full Frame vs. Cropped Frame – Full frame cameras tend to come with a higher price tag than cropped sensor cameras. Full frame cameras will give the true focal length of a lens, while a cropped sensor camera will be slightly more ‘zoomed in’ with the same lens. For example, a 35mm lens on a cropped sensor camera will behave more like a 50mm lens. There are many different equipment set-ups that will work for cooking videos but these are all points to consider and research before purchasing any new equipment.
Focus – Choose a camera that has tracking focus and/or continual autofocus during video mode. Because of the movement during video shoots, it can be frustrating to try to keep the action in focus manually.
DSLR vs. Point and Shoot vs. Phone – We prefer using DSLR cameras for our cooking videos. Like natural light, it helps to mimic the overall style of food photography on Pinch of Yum. If your DSLR does not have video capability or you are looking to keep costs down, consider looking into using your phone or a point and shoot camera. There are a variety of portable cameras on the market, such as the Canon G7X that give you great control over your video, have tracking focus, great color, and a flip-up screen to help you monitor your video while shooting.
Monitor/Tethering Capabilities – When choosing a camera for cooking videos, consider its ability to tether or shoot in such a way that you are able to see the action while shooting. Canon cameras often come with a free software for your computer that allows you to live view film. This is helpful for seeing what is in frame while shooting a video. Some cameras have flip-up screens that can be helpful, too. Be aware of the size and ease of watching these screens while shooting. You can also purchase a separate HD monitor to connect to your DSLR camera in order to view what your camera is recording in real time. Having a monitor or tethering set-up is extremely helpful particularly if you are recording videos solo.
No matter what software you use, here is a general workflow for editing a cooking video:
1. Import the video clips into your software program.
2. Drag overhead shots into your project’s timeline in the correct order.
3. Do any and all color correction or exposure adjustments before you start slicing up clips. This will save you tons of time in the editing process.
4. Decide what side angle shots or close-up shots you want to use (if any) and lay them over the top of the overhead shots. Do any color correction to those clips.
5. Speed-up clips. We often speed-up clips anywhere up to 2x speed. 2x is a good place to start and can be adjusted as you get further into your editing.
6. Go through clips and delete any areas without action. These are the periods of time during which your hands were not in frame, or at the beginning or ending of a clip. Cutting out these down times keeps the video snappy and interesting.
7. Bring in music.
8. Adjust clip lengths and speeds to fit with music changes and tempo and to achieve the overall desired length of video.
9. Add-in text over video where you want to specify ingredients or instructions.
10. Watch through the entire video and adjust anything as needed.
11. Export the video and share.
What about you? Have you ever recorded videos for your website or social media accounts? What equipment did you use? Software? What did you learn in the process?
We’d love to hear your thoughts in the comments below.
Hey Bjork – thanks for putting this together. I’m getting started with my own YouTube channel, and while have a few videos already up there that were shot professionally, I’d like to try to shoot some on my own. My super quick question for you is in regards to using the iPhone for audio. I’d like to test this out, but was curious if there was a particular app your’e using or if you’re just recording it using one of the built in tools. Thanks so much for sharing all your wisdom with us!
Awesome! Happy to hear that you’re giving it a go on your own Alyssa. It’s really nice to have someone help with video but it can quickly get really expensive. :/
I actually just record a video with the iPhone and then just place it close to the subject (Lindsay in this case). Then I import that video into FCPX but only use the audio.
Super helpful, thanks!!
One final question for you – do you create those final screens on your videos (where it shows what to check out next) in a program other than FCPX?
Those are done in FCPX. We just drop in and shrink down the previous videos and then drop in an annotation in YouTube.
Hey Bjork, that’s great! I had been considering to shoot recipe videos for YouTube for a long time.
The gear you use is incredible, I always hear people talking about DSLR video shooting. I never tried, but…
I use a professional camera, the Canon EOS C500, it’s not a DSLR, it’s a cinema camera that can shot RAW 4K. The lenses is a kit of all the CINE lenses by Canon, but I can use the same lenses that I use on my 1DX.
For the editing part, I use the Adobe Premiere Pro, I LOVE IT! I tried so many different options, but no one works well for me as Premiere Pro.
Like, I shoot in RAW, so I need to do colour correction in the video, so I use the software Davinci Resolve with the control surface.
I use two Wacom tablets, The Intuos Pro – That i also use to edit my photos – And the Cintiq 24HD Touch.
I know, it’s very complex, time consuming, but that’s my favourite way to work. Sometimes, when I’m shooting a video, editing the video, I stop and think ‘Am I shooting a video for YouTube, or a Hollywood Blockbuster?’
I Loved this post Bjork, thanks for sharing with us. =D
Your gear is INCREDIBLE! Really, really cool.
Do you have any examples of videos that you’ve shot in the past? I’d love to check ’em out.
Hey Bjork,
At this moment I don’t have any because I’m shooting a project for a friend, and he wants to keep the project in secret.
But, when I finish this project, or he give up – what comes first – I will record a recipe video using a recipe from Pinch of Yum, and I will post on Food Blogger Pro along with a Behind the Scenes.
😀
Sounds good! I’d love to see it. Thanks!
Hey Bjork,
thanks for the post, I think your set up makes a lot of sense. Actually, I would have gone for the same, if I had the money for it. Went for some cheaper solutions, that are also fine for now 🙂
I started my youtube channel about 3 months ago and wrote a little article about my experience. Check it out, if you like: http://hurrythefoodup.com/a…
Btw, I wanted to comment on topics in the community forum, but I couldnt. Is it only possible for paying members?
Best,
Howie
Awesome! Congrats on getting up and running with that and good work getting Gordon Ramsay to come on. 🙂
Yep. Forums are open for reading but only members can post.
Keep up the good work Howie!
haha, thanks 🙂
Ah, ok! Thanks for the info.
You probably already thought about it: Add a call to action button a la “want to post something? Get Premium!” somewhere around the thread.
I was a little lost searchin for the “post” button 😉
Great feedback Howie. It’s on our (very long) to do list. 🙂 A good reminder to prioritize that.
Should I use canon 90d or 7d mark ii? This post is old???
Hi, Cen!
This post just has some of our best recommendations when it comes to cameras and gear for video photos. We highly recommend the Canon EOS 7D Mark II if you’re looking for a good option!
Hi Bjork!
Great info here on getting set up for YouTube 🙂
I use the Zoom recorder also but it is hooked up to the more economical Audio 2000’s wireless mic system which has served me well this past year. I also shoot with three cameras: Canon Vixia HFM300 which are about four years old and my point of sharing these cameras, is that you don’t need the shiniest new camera on the market to produce great quality video. Please note that I REALLY DO want to upgrade to a DLSR next year for improved visuals, especially depth of field.
The two items that saves my butt every shoot is to have cameras with wireless remotes and very stable tripods with dollies to move around.
I do not edit my own footage, I have that professionally outsourced, but I do edit some of my smaller shoots (Tips and such) with Adobe Premier Elements 11 and that serves me very well.
Gary
Thanks so much for sharing Gary! For anyone reading the comments you can check out Gary’s channel here: https://www.youtube.com/cha…
Dollies! The thought never even crossed my mind. What do you use?
The dolly’s make my life so much easier, moving them from inside the house to my outdoor set, repositioning my cameras, etc Here is the dolly that I am using: https://www.amazon.com/dp/B0077M2958/ and https://www.amazon.com/dp/B000YB862E/
This is a picture of one of my rigs with the dolly attached and a 7″ LCD monitor. I used the sun shade for obvious reasons.
I also use a homemade 4ft jib crane.
Gary
Brilliant. Thanks for those links Gary. Others will find that helpful as well.
I didn’t see the picture. Did it maybe not upload?
I can’t seem to get the photo’s to upload Bjork.. not sure why???
Weird! What file type are they? Not sure why that would be happening.
Feel free to email them to me and I can upload.
This turned into a bigger project than you were asking for. 🙂 Sorry about that!
Here they are! Thanks Gary.
Here you go! Perhaps I had the files to large last time?
dolly photo
Great info! ( as usual)
I just got a canon 6d and I have noticed that the camera doesnt have AF ( auto focus).. I tried to record a mini cooking video and when my hands moved they got unfocused. How do do guys get the videos focused usinf the 6d? Do you manually focus it constantly? …I got into forums to figure this out but no clear answers… Thanks very very much Bjork for being do generous! The food photography I purchased from you guys is priceless!! Thanks
Great info I would also add in lighting 🙂 When we started adding in some cheap lighting it made a world of difference in the quality of shot we could get. We use the 1.8 (although Nikkon) for the food shots but go to like 2.4 for face/interview style shots of Lacey’s face 🙂 Thanks for the post
Great point Dustin. Our hope is to shoot in natural light as much as possible, but we’re Minnesota people which means really early sunsets in the winter. Lighting will be an important item to add to the list.
Hi Bjork thanks for this post. Lindsay just sent me the link. So one “newbee” question. Given the 6D doesn’t have a headphone jack I assume the audio is recorded separately and then you sync it together correct? Is this hard to do or does synchronize clips make it fairly easy? Thanks again for this information.
Cindy
Yep! You got it Cindy.
Check out #1 on this post: https://www.foodbloggerpro…
Thanks Bjork. Audio is so important and this will be a big help. Thanks!
Thanks for this! I have literally been making mine with my iphone in my hand. I can’t wait to get a tripod!
I ordered the Overhead Pro Tripod as their website says it can be use for both iPhone and DSLR but it’s not the easiest tripod to use. I find the release gets stuck, the ball head is constantly moving even when tightened all the way, the legs are not the easiest to adjust and when adding an arm for the DSLR (which they say can be use on their tripod) it’s impossible to adjust the legs out of the frame. I’m a little frustrated with the product and want to return it. Aren’t there attachments for the iPhone that can be purchased for most arms? Really wish I had not purchased this and just gone for a more substantial tripod. Looking at your photo for overhead videos and wondering how the camera is attached to that Manfrotto arm?
A wonderful post. Thank you for generously sharing all that you have learned. I have a quick question. My Nikon D5100 will only record for 20minutes. Is there a way to work around this or do all of the cameras you recommend have unlimited time to avoid the recording stopping mid recipe? Thanks in advance and thank you again for this post.
I make cooking videos from my mobile phone, which camera should i purchase to make cooking videos
Please suggest
My biggest question is related to steam. How do you keep from steam up your camera leans?
Hi there! Can you try a fan? Position it so that it blows the steam out rather than up to your lens. 🙂
I also had this question about the stem fogging up the camera lens. Is this all you need, a fan? Is there any other special equipment that you need to buy to stop your lens from fogging up when taking overhead cooking videos? I’m interested to know what Pinch of Yum uses and also what other food bloggers use.
Hi Chrissie! Great question. I asked Lindsay (Pinch of Yum) and she said:
“We have used a fan in the past, but at this point in time, we just take a big reflector and wave it around! But it’s a little easier because there’s two of us working on it (me cooking and Landon filming).”
Not exactly high-tech, but gets the job done!
I used to shoot cooking videos for my youtube channel.But i had no idea about shooting cooking videos like angle knowledge or anything. Whatever i shoot with common sense.I used to shoot with my mobile phone Samsung glaxy J7. I shot my videos horizentally. The most difficult part was audio qulaity as i had know knowledge about mikes or microphone. Video quality was fine but i was not happy with the audio quality that my video had.Background unecssray noise.Editing was very tedious process for me I hate that part.Inspite of spending lot of time in editing my video didnt come out to be good quality one.But now Iam learning bit by bit So will start shooting again😊
Hi!
I’ve been trying to find out how to edit if I record a cooking video with my Canon Rebel T6 and iPhone at the same time (like iPhone overhead and DSLR at 45 degrees). There aren’t many resources for that scenario. Does anyone do that or do people use two DSLRs? I did read that I can download my DSLR footage into iMovie so I suppose I can edit the footage from both my iPhone and DSLR together in iMovie? I haven’t tried but wasn’t sure if it works together…
I’d love your opinion!
Thank you!
Radka
Hey, Radka!
We’re big fans of using what you have and then upgrading when the time feels right. You can certainly use you iPhone and your Canon together! We’re recommend using the Canon for the overhead shots and then your phone for the side-angles. 😊
Good luck!
I made many cooking demonstration videos for my 8 th grade foods classes. Nothing professional just a camcorder. I think I posted about 39 on YouTube.
That’s amazing! Way to go, Chris!
Hey Bjork! When editing video for the blog post, is it better to use a vertical or horizontal orientation? 75% of my audience it on mobile devices, but it seems everyone is using horizontal. Is there a reason for that?
Thank you so much!
Great question, Jamie!
I think the reason that a lot of bloggers use horizontal videos for blog posts is that they’re embedding the videos using YouTube or an ad network like Mediavine or AdThrive. All those tools have specific requirements when it comes to uploading videos, so if you use them, you have to adhere to their specific orientation requirements.
I hope that helps — let us know if you have any other questions!
Hi my name is Allee I have a food blog I started called Allee’s House. I have a
small following on Tik Tok starting at 15.5 K and have trouble growing Instagram. I also need to learn how to allow adds on my website and maybe tightly that up as well. I’d love to learn more professional ways to share my recipes. Also, a dream of mine is to one day publish a cookbook. Would love any guidance, classes, anything I can do to learn more. I love pinch of yum and all your amazing recipes. Thank you so much!
Hi, Allee!
15.5k on TikTok?! That’s incredible! I have no doubt that your Instagram following will grow as well.
In terms of ads, we do have a blog post all about the most popular ad networks for food bloggers here. It will hopefully get you pointed in the right direction! We also have a course on Food Blogger Pro all about Understanding Ads that goes into a bit more depth.
I’d also recommend checking out our podcast if you haven’t yet! We’re doing a series right now called ‘From Blogger to Cookbook Author,’ and it explores what it takes to publish a cookbook as a blogger.
I hope that helps — let me know if you have any other questions! 🙂
Hey guys, great article, I was just wondering are there any updates to either main camera (currently discontinued) or the side angle camera? Also I couldn’t find the mount for the FeelWorld screen, looks like you are somehow hanging it on an arm.
Apologies if the questions are basic, but I am just starting to look at serious gear.
Thanks for reading — we’re glad you enjoyed the article! I think the main camera and the side angle cameras might be available on some other retailer’s websites. Are you able to find them elsewhere?
Also, I asked our Video Specialist about your second question, and she said she uses some clamps and various arms depending on the setup. She can’t find specific links, but here is something similar to what she uses (she would just recommend that you figure out where you want to mount your monitor and then get clamps/arms that will allow you to mount it there):
Photography Super Clamp
SUPON Camera Super Clamp
Thanks for sharing. It’s a very informative blog.
The DSLR camera lenses, now and again called the “eye” of the camera, is seemingly the main part of the camera. The further developed you become, the more you will be gone up against with different specialized terms. Sooner or later, you’ll most likely likewise need to update your lenses past the standard unit form you initially got with your camera.
We’re so glad you enjoyed the post! And great point — that’s so true!
Great information! Thank you so much for breaking down the details.
Glad you found the post useful! Thanks for reading.
Good article and thank you. Eight years now in this industry with filming manufacturing videos and you can never know enough in this field! Ha. https://industreel.net
Agree! There is always more to learn. 😅
I noticed in your earlier lessons/videos Pinch of Yum was using two 7D mark 2(crop sensor), one for overhead and another for side view. But in this article it mentions that you are using the 5D mark 4(full frame) for overhead. What is your reason for switching to the full frame camera for overhead? Also is there a reason you prefer a crop sensor for your side angle?
Hi Chelene! Great question, I’ve reached out to Lindsay at Pinch of Yum and will get back to you with her response!
From Lindsay –> I think I made the switch years ago because Bjork recommended it! I think full frame is generally considered to be higher quality than a crop frame. And at this point I’m using that 5D Mark 4 for all my photos (well, that and a phone)!
Hope that helps!
Loved this post! It’s so helpful to see the specific gear you use for recipe videos. I’ve been looking to up my video production game, and your recommendations are super insightful. Thanks for sharing!
Happy to hear you found it useful! Best of luck – we can’t wait to see the videos you create!