Do you have a favorite super hero? I have always been fascinated with Mighty Mouse. I love the idea of a tiny little mouse that has a really big impact.
There are a lot of different “Mighty Mouse” elements that exist when you’re growing a blog. These are seemingly small or unknown things that in actuality have a big impact on the success of your blog. One of these “Mighty Mouse” elements is the img tag. In today’s post we’re going to dissect the img tag and explain how it can super power your food blog.
You can click here to download the image we’ll use as an example in this post if you want to follow along!
What is the img tag?
The img tag is the HTML code used to communicate information about an image to a user’s web browser. When looking at a website, we humans see images, but your computer sees HTML code.
I think the best way to understand is by doing, so let’s jump in and explore this together.
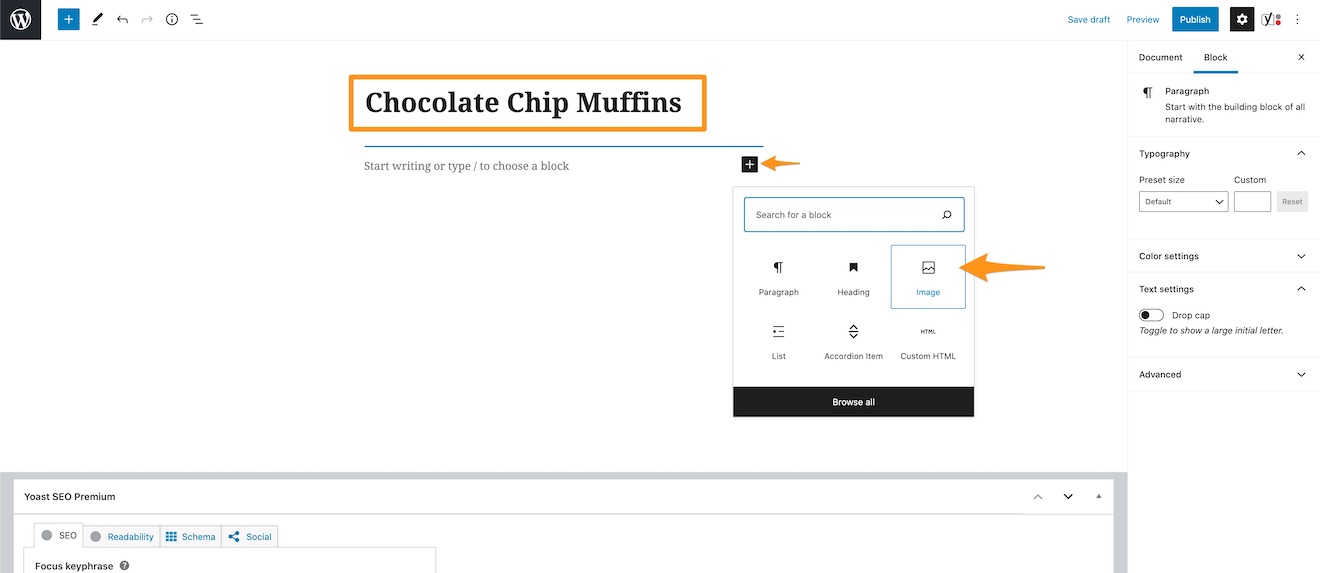
1. Login to your blog (we’ll use a WordPress blog in this example).
2. Hover over Pages and select Add New (don’t worry, we won’t be publishing this page).

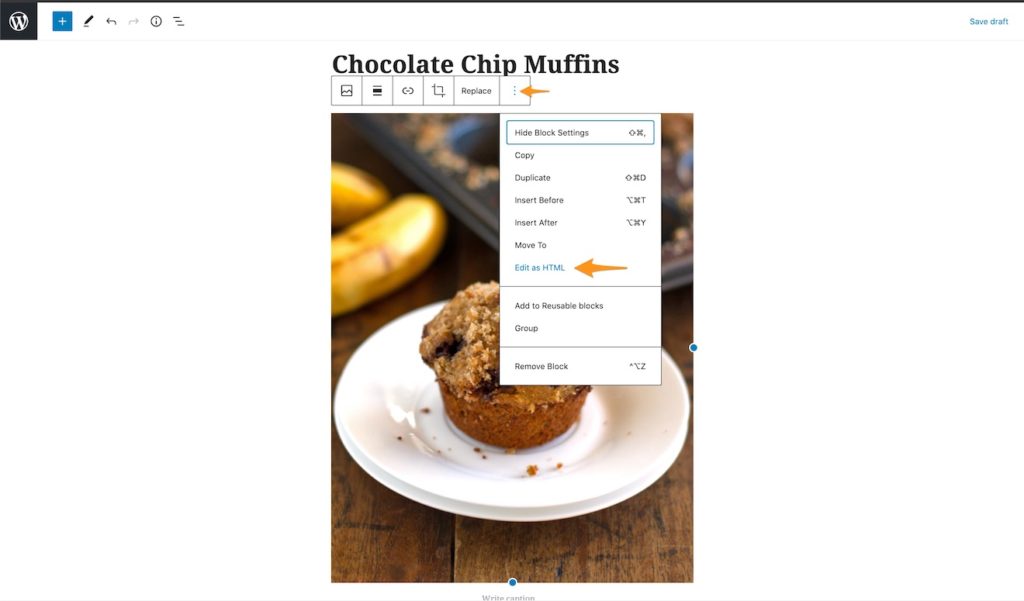
3. Add a title of Chocolate Chip Muffins and then click the + button and then click Image to insert an Image Block.
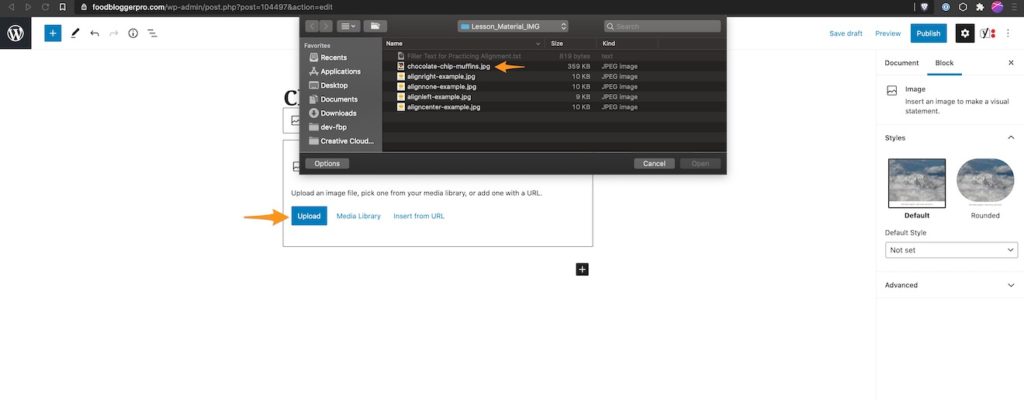
4. Click Upload. Find and click the chocolate-chip-muffin.jpg image you downloaded to use as an example.
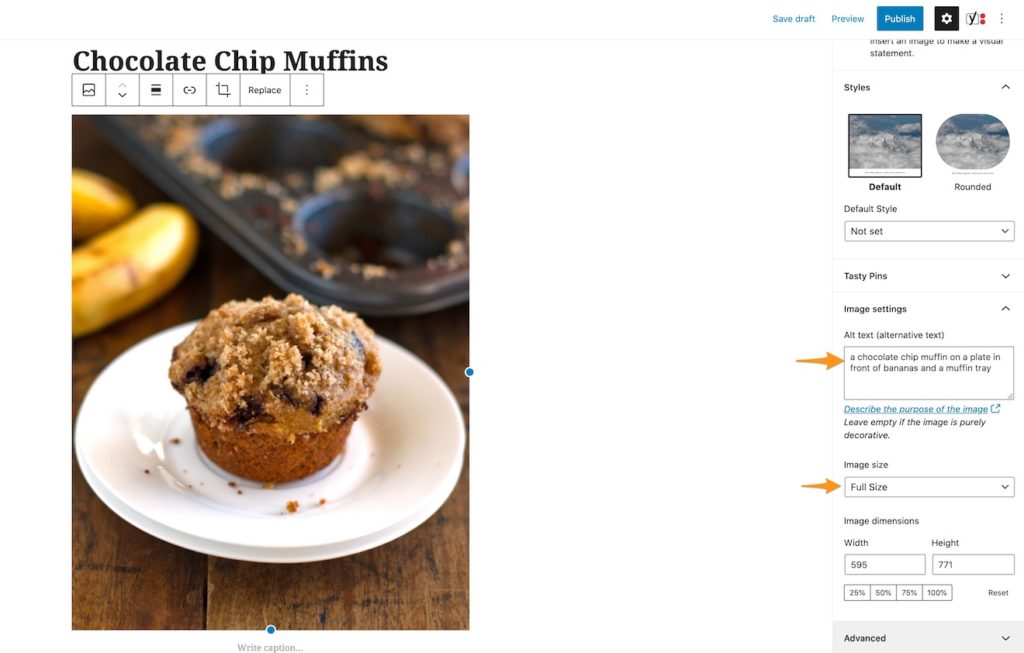
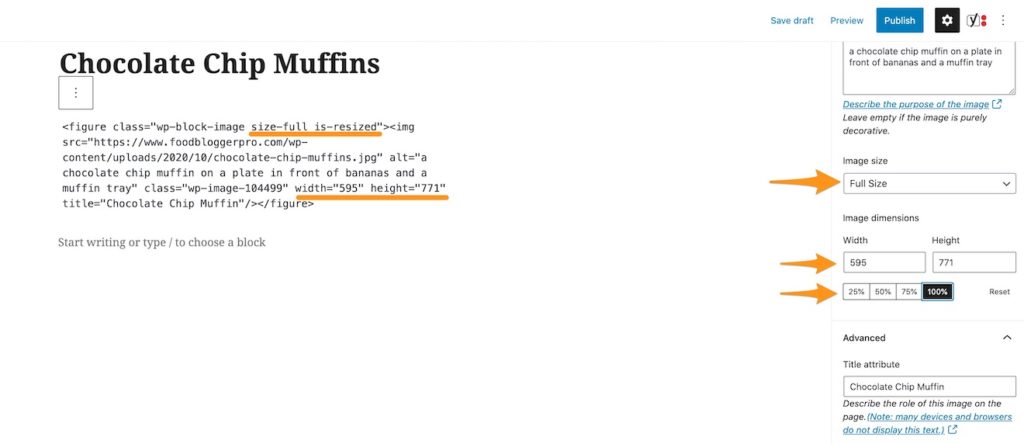
5. Under Image Settings, set the Alt Attribute and Image Size:
Alt Attribute: a chocolate chip muffin on a plate in front of bananas and a muffin tray
Image Size: Full Size
6. Your image is on your page! Now let’s take a look at the HTML code that WordPress is using behind the scenes. We can see the HTML code by clicking on the image, then by clicking the three vertical dots and finding Edit as HTML.
7. Cool! We’re now looking at the img tag exactly as a web browser would see it when it comes to our blog.

The begin and end of the img tag
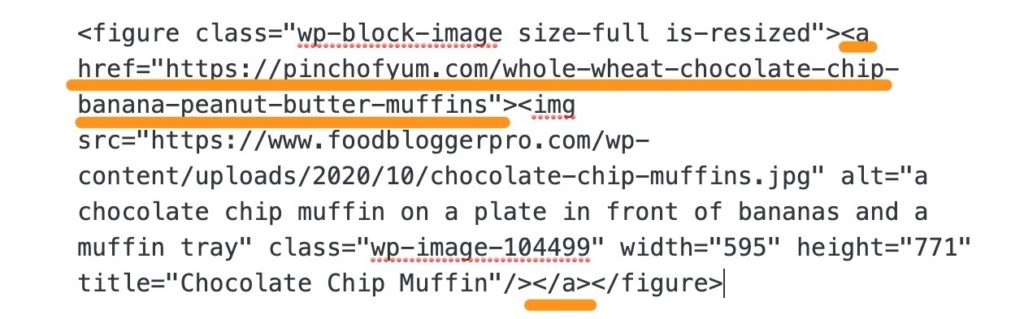
The first part we need to look at is the img tag itself. I put an orange line at the beginning and the end of the image tag. The first orange line shows where the tag starts, and the second orange line shows where the tag stops.
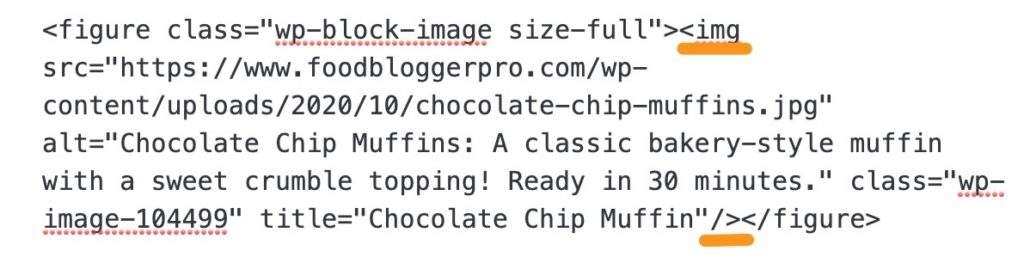
It’s important to know where the beginning and end of the tag is so we can examine everything that’s inside of it.
You’ll also see a figure tag that surrounds the img tag.
That’s some code that WordPress automatically adds to all of the blocks (i.e. paragraphs, images, quotes, etc.) on your page. You can ignore it for now.
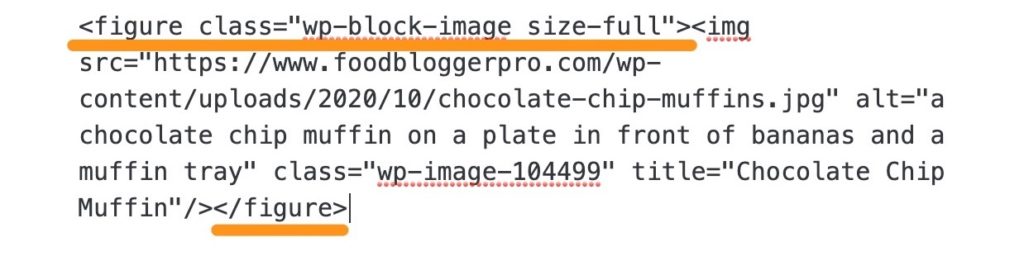
The parts that are inside of our img tag are called attributes. Let’s take a look at the four attributes that are inside of the img tag and talk about how they can super power your food blog.
1. The class attribute
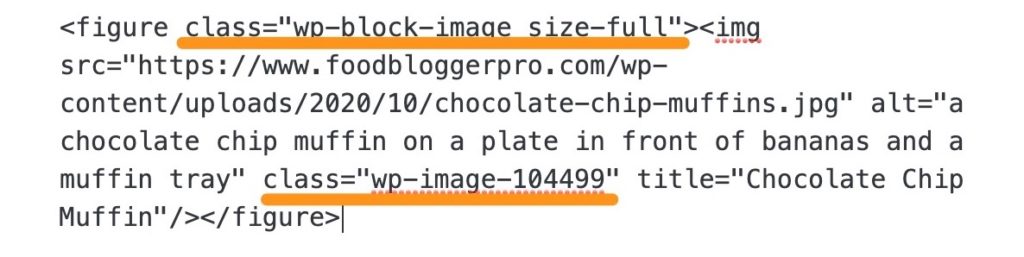
You’ll see the class attribute both within the figure tag and within the img tag.
We’re not going to spend much time with the class attribute, as you’ll only use it if you’re familiar with CSS (CSS is a type of code that helps you add style to websites).
You’ll see classes like “wp-block-image” and “size-full” at the figure level. The “wp-block-image” class is just applying certain styles to every image you upload in one of those image blocks. Size “Full,” if you recall, is the image size we set earlier:
We can change the image dimensions using that side menu bar (here we just clicked 100%), and that will add width and height attributes to our image tags. It also added another class, “is-resized.”
Let’s go back to our original image. We also see a class within the img tag.
This isn’t anything we’ll need to adjust manually. You can really get into the weeds by adding new classes to your images and adjusting the styles for all of the images on your site, but we just wanted to give you a quick overview.
Interested in learning more about CSS?2. The alt attribute
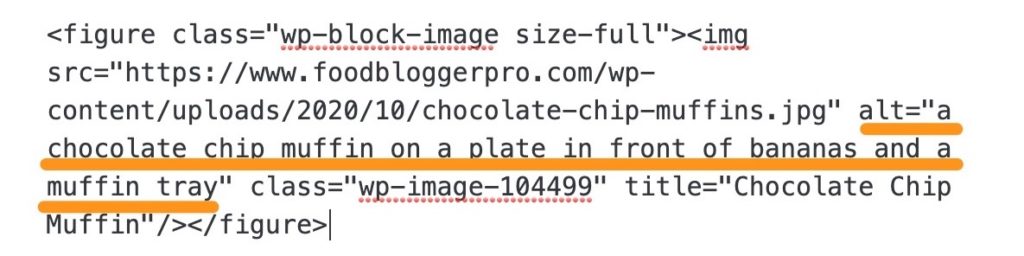
It’s easiest to remember the alt attribute as the alternative attribute, as in what text should be displayed as an alternative if, for whatever reason, the image can’t be displayed.
There are two reasons why the alt attribute is really important:
- Usability: It communicates information about your image to visitors who are visually impaired or have slow internet connections.
- SEO: It communicates to search engines what your image is about.
Usability
Visitors that are visually impaired will use a screen reader to process the information on websites. A screen reader will go through the different parts of a website and attempt to read back information to the user. This works really well for text, but it doesn’t work as well for images. Providing descriptive text in your alt attribute supplies the screen reader with content that can be read back to the visitor, enabling them to better understand what the image is about. Imagine how you would describe your image to someone that is visually impaired. That’s a good starting point for what you should put in as your image’s alt attribute.
Not only that, your readers may be on slow internet connections and your big, beautiful food photos may not load. This alternative text will load instead.
SEO
When a search engine like Google comes to your site it will crawl through your page and attempt to understand the information on your blog post. Search engines are really good at understanding text, but not so great at understanding images. That’s why the alt attribute and the image’s file name (more on that later) are so important for your food blog’s SEO. If your file name is IMG_9205.jpg and the alt attribute area is empty, then you’re not giving Google any clues to help it figure out what your image is about. Providing an accurate and informational alt text helps Google understand your image.
Nerd Note: Never try and trick Google by adding a bunch of words into your alt attribute in an attempt to help your post show up higher in Google. This would be an example of keyword stuffing and could actually end up hurting your blog’s rank in Google. Just do your best to provide an accurate description of the image.
Another Nerd Note: Not every image actually needs an alt attribute. If it’s a decoration (like an icon on your menu bar), you can leave the alt attribute blank. Here’s a nifty decision tree you can use to help you determine whether your image needs an alt attribute or not.
How do you write an alt description?3. The src attribute.
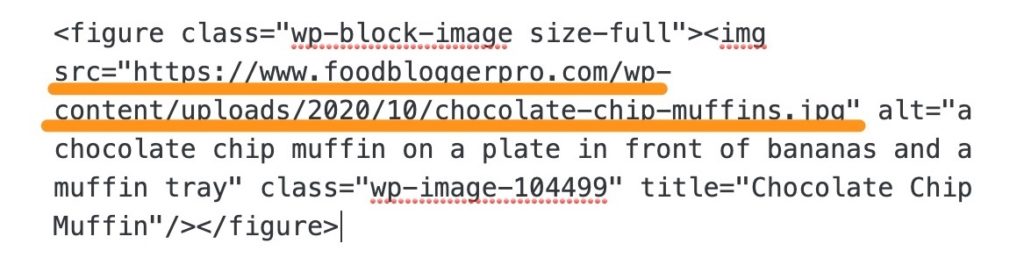
The src attribute is telling the browser where the image is located on your server. It’s easiest to remember the src attribute as the source attribute, as in this URL is the source of the image.
This isn’t critical to know, but I think it’s interesting: Your blog’s images are organized the same way that they would be on a computer — where every image is stored in a folder. So, if you’re using WordPress, the URL for your src attribute will usually look like this:
http://yourblogname.com/wp-content/uploads/2014/01/your-image-name.jpg
In our example, the URL is:
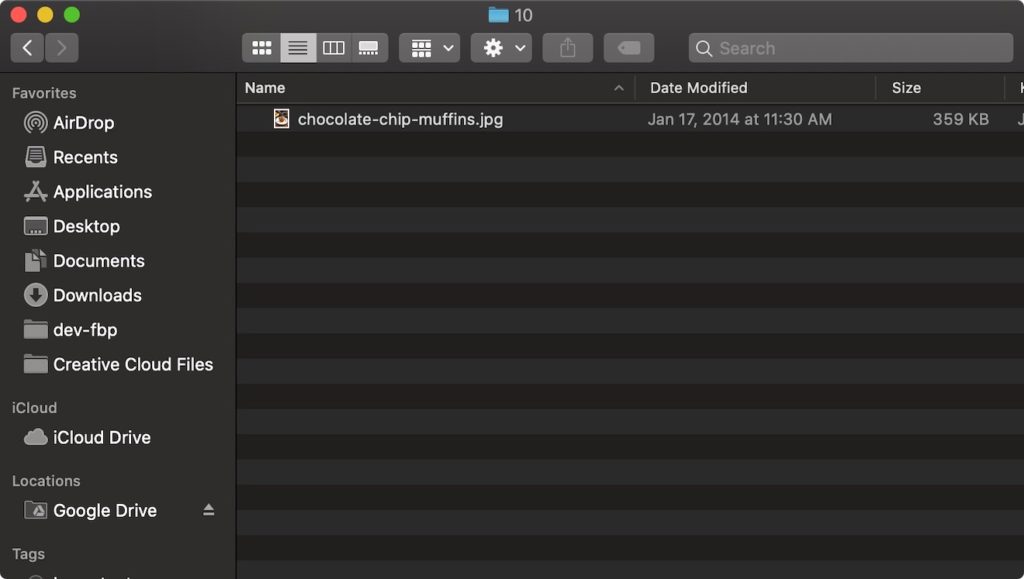
https://foodbloggerpro.com/wp-content/uploads/2020/10/chocolate-chip-muffin.jpg
That means that there is a folder on our server called wp-content:
foodbloggerpro.com/wp-content/uploads/2020/10/chocolate-chip-muffin.jpg
…and in that folder there is another folder called uploads:
foodbloggerpro.com/wp-content/uploads/2020/10/chocolate-chip-muffin.jpg

…and in that folder there is another folder called 2020:
foodbloggerpro.com/wp-content/uploads/2020/10/chocolate-chip-muffin.jpg
…and in that folder there is another folder called 10:
foodbloggerpro.com/wp-content/uploads/2020/10/chocolate-chip-muffin.jpg
…and in that folder we can find our image:
foodbloggerpro.com/wp-content/uploads/2020/10/chocolate-chip-muffin.jpg
Nerd Note: You can actually copy the URL in the src attribute and paste it into your web browser like it is a website. When you do that it’ll bring you to a web page, but the only thing on the page will be the image.
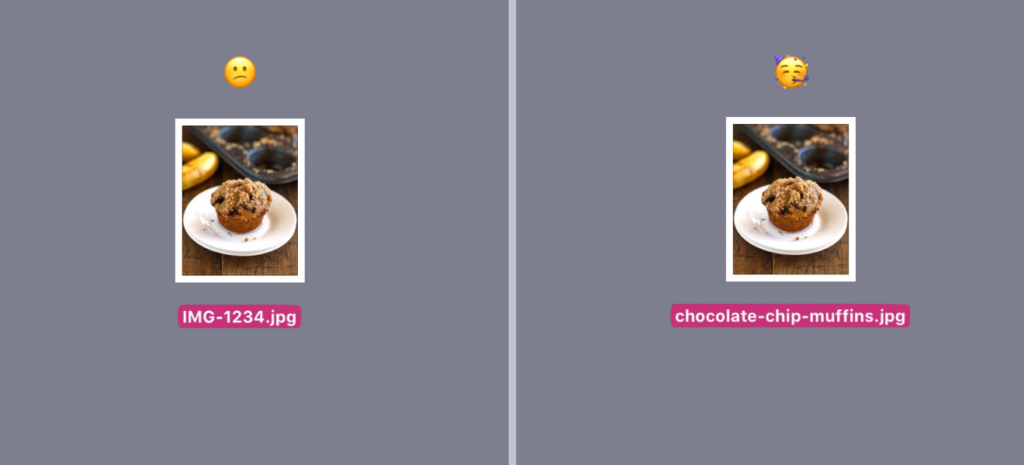
The most important thing to consider with the src attribute is the file name that you give to the image before uploading it. The file name is important because search engines use it to try and figure out what your image is about. If your image is of a chocolate chip muffin, make sure that you don’t have a file name of IMG-1234.jpg, because that’s communicating to the search engine that your image is about “IMG-1234.jpg,” which doesn’t really make sense.
It would make much more sense if you call your image chocolate-chip-muffin.jpg, because that’s the actual content that is in image. This is an important concept, so I’ll bring in some emojis to help make my point.
There are lots of different ways you can change the file name of an image. Here’s how I usually do it:
- Click on the file
- Right click
- Click Rename
- Rename your image
You want to do this before you upload the image to your blog, as it’s really hard to change the file name after you uploaded the image.
4. The Pin Description.
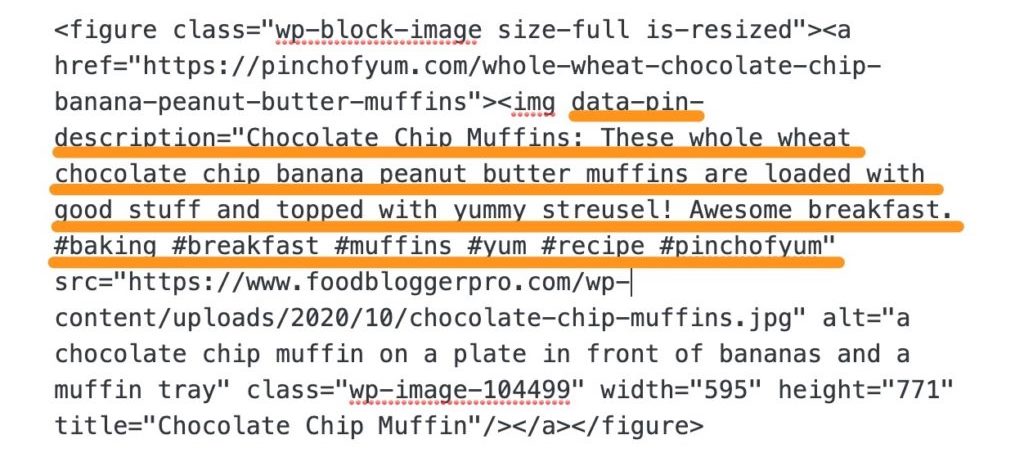
Woah! What’s that?
You may not see the data-pin-description attribute on your images, and that’s okay. We see that here because we’re using a plugin (Tasty Pins — it’s actually one that we developed over on our sister site, WP Tasty!) to add that attribute for us.
Why is the data-pin-description attribute so important?
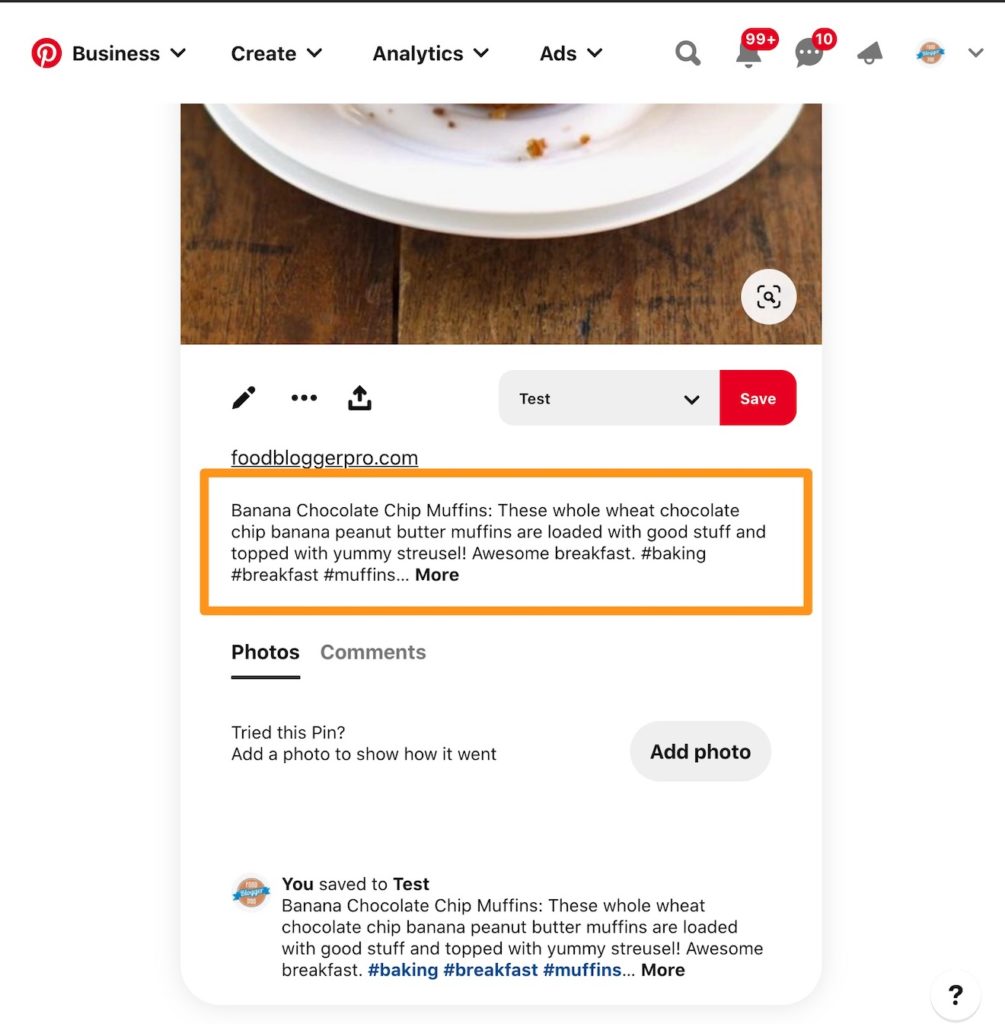
Pinterest is a huge driver of food blog traffic (we eat with our eyes, after all, and Pinterest is a highly-visual social platform), so we want to make sure we’re doing everything we can to optimize for traffic from Pinterest.
That’s where our data-pin-description attribute comes into play. It helps us add custom Pinterest Text to each of our images so that our images have descriptive and searchable descriptions.
Here’s what that looks like on Pinterest:
Linking an image to an image 😕
Occasionally I’ll notice a blog that is linking all of its images to a page that is just another picture of that image. I’ll provide an example below. If you hover over that image you’ll see that you can click on it. When you do click on it you’ll notice that it opens a new window that contains the same image.
This doesn’t hurt anything, but it’s considered poor form (unless you’re linking to a larger version of the same image to allow the visitor to see it better).
That said, there are instances when it makes sense to add a link to an image, like if you’re publishing a recipe round-up. It might make sense then to add a link back to the source of the original recipe when someone clicks that image. You’d do that by:
- Clicking on the image
- Clicking the link icon
- Pasting the link in the field
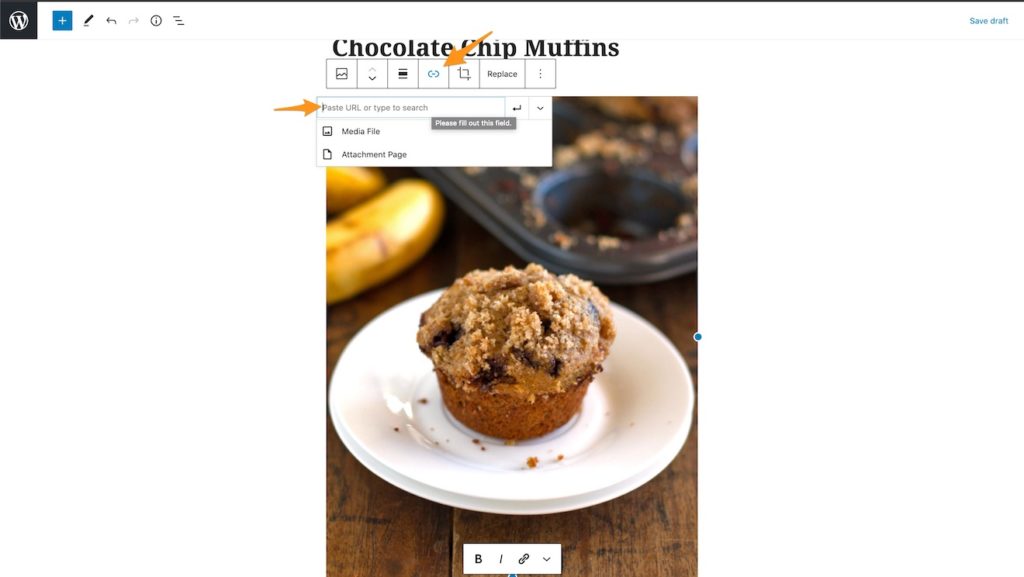
This is what that’ll look like in code form:
Editing and updating your img tag
We’ve dissected the img tag and understand the attributes that are located inside, but how the heck do you put them in correctly in the first place (or edit them if you know you’ve done it wrong in the past)?
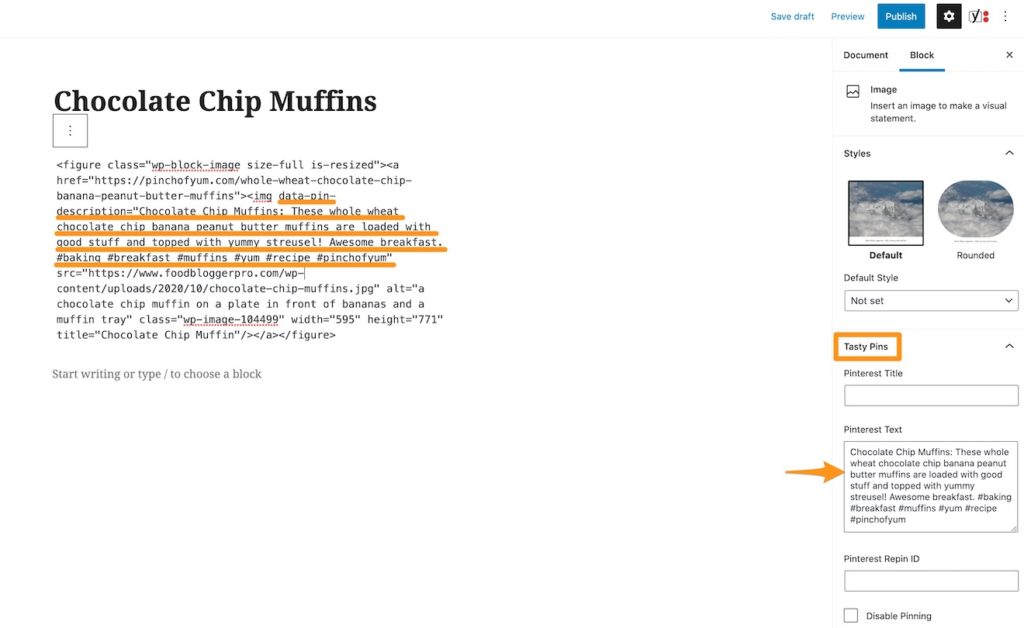
Attachment Details
The easiest way is fill out the information in the Attachment Details when you’re first adding the image.
It’s super simple, but many people rush through this part. The screenshot below shows a basic example of an image with properly formatted Attachment Details. You’ll see that we’ve filled out the Pinterest Text and the Alt Text (and the Title has been auto-filled).
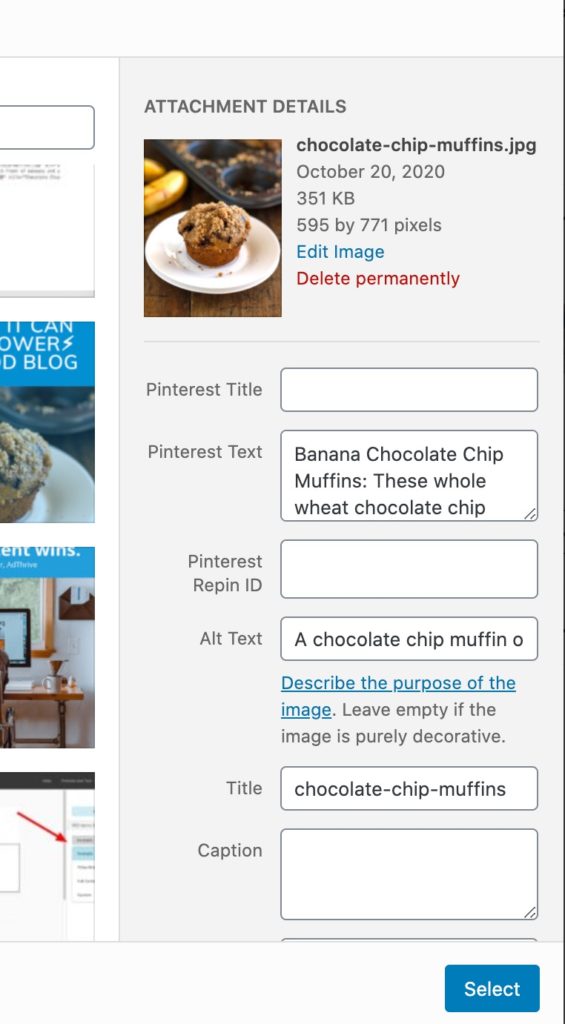
Nerd Note: Here’s a quick explanation on the other fields in this screen: (1) The Pinterest Title is auto-filled by Pinterest and comes from Tasty Pins. You can leave this blank. (2) The Pinterest Repin ID also comes from Tasty Pins and is used to help readers pin existing pins. You can read more about that here. (3) The Title attribute is no longer used in WordPress, so it’s not a critical area to fill out. It was auto-filled here. (4) It’s rare to see a caption used on a food blog (as the pictures are pretty self explanatory). (5) The description (which isn’t pictured, but it’s below the caption) is for your own internal use and won’t show up when you insert the image.
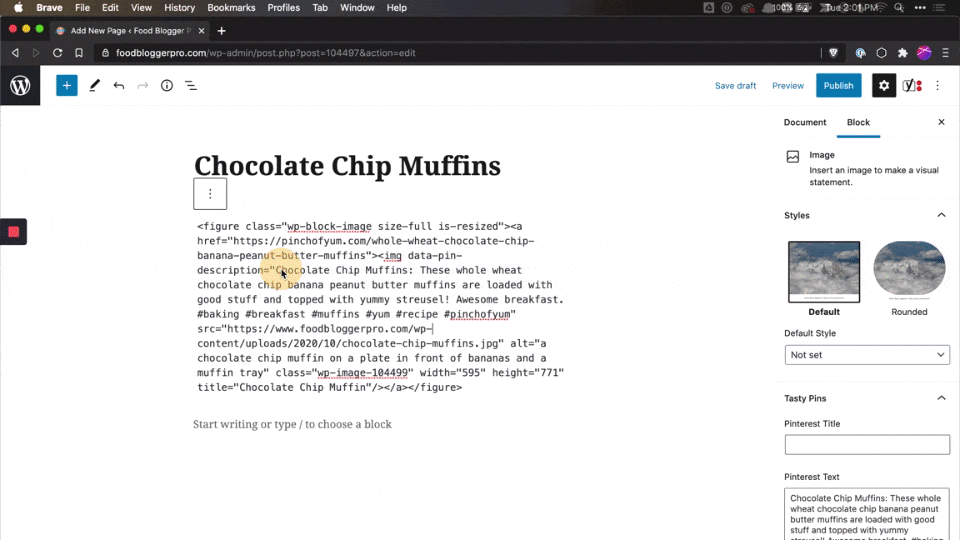
Editing the HTML Manually
At the begin of this post we switched our block from a Visual view to the HTML view:
Once you’re in the HTML view you can easily update the different attributes of the img tag.
Conclusion
Did you make it all the way through this post? If you did then you’re the kind of person that’s serious about growing your food blog. 😊
I just threw you a virtual high five for going above and beyond and taking the time to understand the img tag. Remember: it’s all about small changes that can have a big effect on your blog. I’m off to watch some Mighty Mouse on YouTube!
I just read this for the third time and realized that I have not mighty moused my img tags 100%. (Hangs head in shame)
Off to remedy this!
Haha. Love the phrase mighty moused. 🙂 Good luck Beth!
Thank you so much for this. So helpful! We are not a food blog. We use images in our posts to brighten up the page. The image doesn’t always specifically reflect the words in the post (at least not the way a chocolate chip muffin image goes with a chocolate chip muffin recipe). If I name my images with names that go with our posts (e.g. “unconditional love”), will that bring people to our page because of how I named the image? I am also doing some other things in the title, text and permalink to help with SEO. But do you think I should also name my images with the title of the blog post? Thanks!
Great question Gem. I’d create file names that match what the image is about, not necessarily the post. If it’s an image of a father hugging a son you could name it father-son-unconditional-love.jpg. That might be a little long, but you get the idea. 🙂
Thank you so much!
Hi Bjork, thanks very much for this post. I’m having trouble with my alt attribute and was wondering if you have any insight! It seems like Pinterest is pulling the description of my photos from my post title, not the alt attribute. I’ve added my website domain to some of my alt tags to test this. When I pin the photo, the title of my post comes up in the description and no website domain.
It’s even worse on a mobile device. A quick example – I wrote a post called “Baking Tip – Homemade Baking Powder.” The alt description is simply “Homemade Baking Powder.” However, when I click the pin it button on my website, this is what comes up in the description on pinterest – “Baking+Tip+-+Homemade+Baking+Powder.” Does the plugin have anything to do with this? Thanks!
Yep! You got it. It depends on the type of plugin that you’re using with your site. We use Pinterest Pin It Pro: https://pinplugins.com/
Great, thank you!
Hi Bjork, I made it to the end of the post 🙂 Question for you though – I went back into my last recipe post (http://www.jamjnr.com/2014/… and changed the alt description to include my blog name and I have checked the text format to make sure the new alt name is in the tag – get me being all technical! But – when I try to pin the photo the new alt description doesn’t show up in the pin description.
Is this because of the pinterest plugin I’m using? I’m using Pinterest Pin It Button – or is there no point going back and changing the alt description on old posts?
Yep! It depends on the type of plugin that you’re using with your site. We use Pinterest Pin It Pro: https://pinplugins.com/
Thank you so much for this post, it is incredibly helpful and insightful. I really appreciate all of your tips as I try to grow my site allislovely.com Thanks again!
Bjork, this was really helpful! I do have one question…I usually change all of the image names before uploading them. Is there a way to change the ALT tags without doing each photo individually?
I don’t know of a way to do a mass update for the ALT tag. However, if you name your images without dashes before uploading it then WordPress will use that text and automatically put it into the Title field. From there you can just copy and paste the Title field into the Alt field.
Does that make sense? Did it answer your question?
I have not been doing this (for shame!) and am wondering how time consuming/hard it is to go back to old posts and re-name images? Would you recommend re-doing them or just implement it moving forward? Thank you for EVERYTHING!
Just implement moving forward. 🙂
I subscribed to your blog ~ 4hours ago and it is 4 am in the morning and I am still reading your blogpost (along with some others) :O You gave some really good information/tips here. I had no clue about it at all. Thankfully (not really! but jut for this reason) I have just four posts up on my one month old food blog. I have been struggling with images since I started. Can I ask you what should be the best image file size for a blog post? Also, can you suggest a good way or plugin to reduce the size yet keep the visual quality intact? Thanks. PS: I love both your blogs and you two are amazing 🙂 !
Happy to hear that the blog has been helpful. Short answer: the smallest possible size without making it look super crummy. 🙂 Lindsay opts for higher quality images on Pinch of Yum – https://pinchofyum.com/ – but others will err on the side of speed. Check out the community form on photo editing for more tips: https://www.foodbloggerpro…
Today we are introducing Google Tag Manager API, a new simplified interface and additional support for 3rd party tag templates.
If you are already using Google Tag Manager you can try the new features by upgrading your account.
Test and Tag
And if the post has 3 images of the “Chocolate chip muffin” for example, then title and the alt text could be: Chocolate chip muffin 1, Chocolate chip muffin 2… or how should it be? thanks!!!
Great question Carmen! I’d be creative with it and try to not get too repetitive, otherwise it’ll be viewed as keyword stuffing: https://support.google.com/…
Thanks! But then if in a post we have 3-4 photos of the same and we have to avoid numbers, the title and the alt text shoud be the same in the 3-4 photos? Or we put similar title and alt text? thanks!!!
I’d try and make them a bit different. So, for example, chocolate-chip-muffin.jpg and chocolate-chip-muffing-bite.jpb and chocolate-muffing.jpg, as opposed to chocolate-chip-muffin.jpg, chocolate-chip-muffin-2.jpg, and chocolate-chip-muffin-3.jpg
Does that help? Or am I still misunderstanding? 🙂
Thanks!!! everything clear!
Thanks Bjork! That was an awesome tutorial! One little question: Is is beneficial to add the name of your blog to any images or just images that are pinned on Pinterest (alt text)? My blog crazydealicious.com is a combination of recipes and deals. I pin only recipes, so I am curious, if adding the blog name would be beneficial with deal images as well…
I don’t think it would hurt! 🙂
Thanks so much for the great tips! I had no idea what the alt text was for. Now I’ve got a whole lot of photos with weird names I need to fix. 🙂
Bjork and Lindsay-you’re the bombs! I didn’t know about the “Link to” setting. Plus I love your super tips to add the url to the alt tag. I know this, but tend to forget! Thanks for the reminder. It was great to connect this past weekend at #ssbc15 in NOLA. I’m buried with work (in a good way) creating my free ebook and autoresponders list. Thank you both SO much.
So fun to connect this weekend Maureen. Keep on keepin’ on!
Hi Bjork, I recently signed up and I can’t see the images in this post. Am I missing something? I also downloaded the lesson files. Thanks in advance!
Hey Cindy. We made some updates to the site so I just had to clean out a little bit on the blog post. You should be good to go now.
Perfect, thank you!
wow. so incredibly helpful! thank you so much!!
Thank you so much. The detailed directions helped tremendously!
good golly, this was helpful. thank you so much.
Hi Bjork! Thank you very much for the tips – it’s incredibly helpful. I am going to change file names before uploading the pictures from now on. But in the posts that are already in my website can I just change the alt text by editing the post or do I need to rename all the pictures and upload them again? My blog is new there are just about 4 posts to correct. Thank you!
This was an amazing post! Thank you so much for sharing this information. I feel as though this can be applied to all types of blogs! All around good information. I basically went through and made all changes as I read this post!
Tiffany @ arrowsandawe.com
This was awesome. Thank you so much. I have one question: At the end of the article, when mentioning the chocolate chip muffin and the visual where you filled out ‘Chocolate Chip Muffin’, I noticed you did not enter in your website URL there. So, should I change the alts to match the images, as well as input my website URL after each one? Wasn’t sure if the URL thing was just for one picture that will be the pinterest image, or do that will all of the images when it comes to alt text? Sorry! I ask so many questions all the time 🙂 Thanks again and really excited for Food Blogger Pro! Cheers, Jennifer @ fromentfree.com
So many great tips!! Thank you for sharing!
I’ve always (don’t ask me why) copied and pasted my meta description into the alt text box and the description box. I’m taking away that this is not necessary. I thought PInterest liked the entire meta description and picked it up from the alt text box.
This is so helpful! Thanks so much Bjork!
Do you have any resources for naming a food blog?
Hey, Rachel! We have a video on FBP for members about brainstorming names, but to start, I’d think about:
– What kind of recipes you’re going to be sharing
– How you want readers to feel when they come to your blog
– How much you’ll be a part of the blog (i.e. you can include your name in your blog’s name)