As you’ve probably heard, Google Analytics is changing… and soon!
Universal Analytics (the Google Analytics property you’re probably already familiar with) will stop collecting data on July 1, 2023, and a new analytics property called Google Analytics 4 (or GA4) will be the default for all Google Analytics accounts.
Luckily, GA4 is already available, meaning you can set it up today! And the sooner you set it up, the sooner you can start collecting data in your GA4 property.
The setup can be broken into two parts (which we’re breaking into two blog posts):
- Creating a GA4 property (this blog post)
- Connecting GA4 to your site (tomorrow’s blog post)
Even if you’re not a techy person, these blog posts will help you get up and running with this new version of Google Analytics in a snap!
What’s the difference between Universal Analytics and GA4?
Without spending too much time on this (this is a “how to setup GA4” blog series after all!), we wanted to simplify the main differences between Universal Analytics and GA4:
- Universal Analytics classifies engagements with your site as hits while GA4 classifies them as events (think: pageviews, scrolls, and clicks).
- GA4 is more flexible, customizable, and granular.
- GA4 allows you to combine data from multiple data streams –– think websites and Android/iOS apps.
- GA4 automatically filters out spam and bot traffic.
- GA4 makes it easier to track one user from device to device.
So while they’re similar tools, they way they collect and report on web and app data is very different! But before you can dive into actually using GA4, you’ll need to create a GA4 property in Google Analytics.
Create a GA4 Property
If you’ve been using Google Analytics (and therefore Universal Analytics), you’ll just need to create a new property in your Google Analytics account. The data you’ve collected in your Universal Analytics property will remain (for the time being), but you’ll have new data flowing into your GA4 and Universal Analytics properties (at least until July 2023 when new data will only flow into your GA4 property). We’ll cover this process first.
If you’ve never used Google Analytics before, you’ll need to create an analytics account (and a GA4 property in the process). Click here to jump to those instructions.
Creating a New GA4 Property to Add To Your Existing Google Analytics Account
When I say “Creating a New GA4 Property,” I mean this:
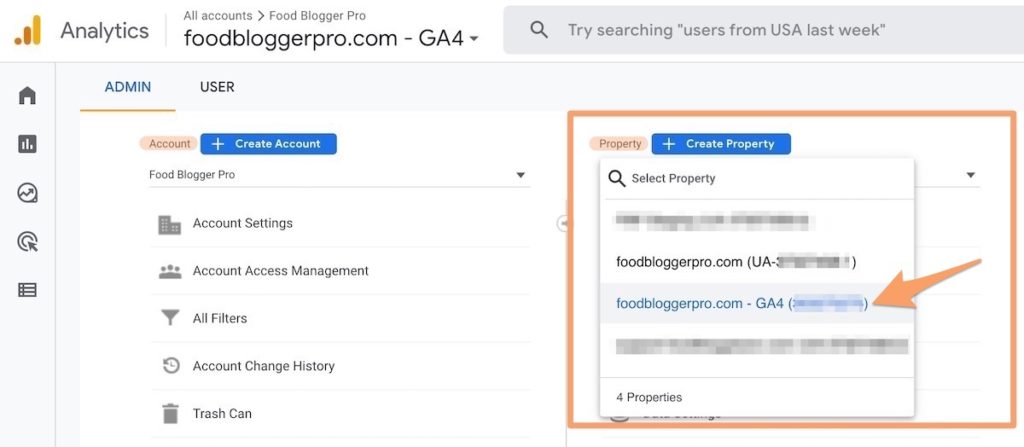
Do you see how there are multiple properties in our single Food Blogger Pro account? While we have some extra properties like a staging site and our support site listed there, I wanted you to see that we also have a GA4 property there! We just added it to our existing Google Analytics account.
Luckily, it’s relatively simple to create a GA4 property thanks to Google Analytics’s handy GA4 Setup Assistant!
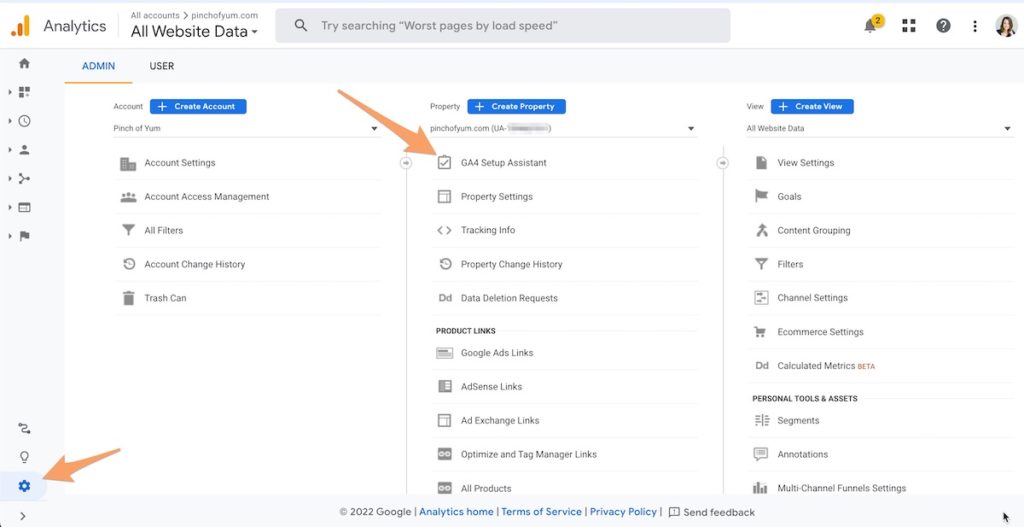
1. Click the Admin gear icon in the bottom left-hand corner, make sure that your UA property is selected in the Property drop-down menu, and then click the GA4 Setup Assistant button.
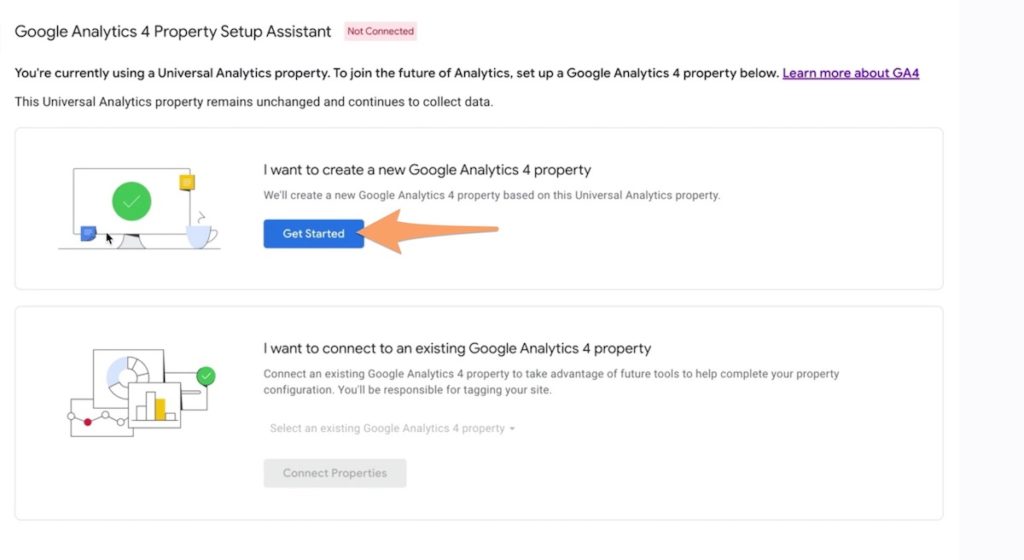
2. Click Get Started in the “I want to create a new Google Analytics 4 property” box.
3. If the “Enable data collection using your existing global site tag(s)” checkbox is checked, keep it checked! If it’s checked, it means that you already use the gtag.js code to connect Google Analytics to your site.

By keeping it checked, your new GA4 tracking information will automatically connect to your site through that gtag.js code! Once you create your GA4 property, you won’t need to do anything else to connect your site to your new GA4 property –– it’ll be done automatically!
If that checkbox is greyed out, it just means that you installed Google Analytics on your site in a different way and need to use one of the methods we outline below to connect your new GA4 property to your site.
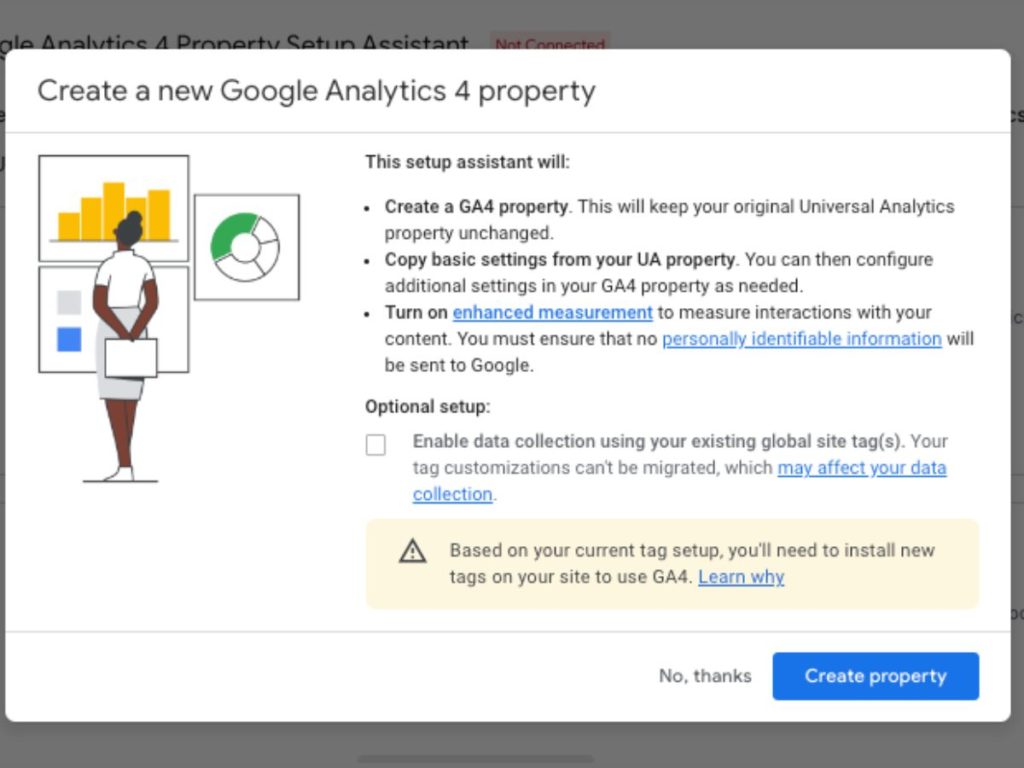
Either way, click Create Property to create your new GA4 property.
4. Your GA4 property has been created! 🎉
The two most important things that the setup wizard just did were:
- It created your new GA4 property.
- It copied the property name, website, URL, timezone, and currency settings from your Universal Analytics property.
If you had the “Enable data collection using your existing global site tag(s)” checkbox checked, your site should already be connected to your new GA4 property and will start collecting data! It may take a few hours for you to start seeing data in your GA4 property, so don’t be alarmed if you don’t see any data at first. That said, you should start to see data in your brand new GA4 property soon!
If you didn’t have that checkbox checked and aren’t already using the gtag.js code on your site, you have a few other steps to connect your new GA4 property to your site (which we’ll cover in tomorrow’s blog post!).
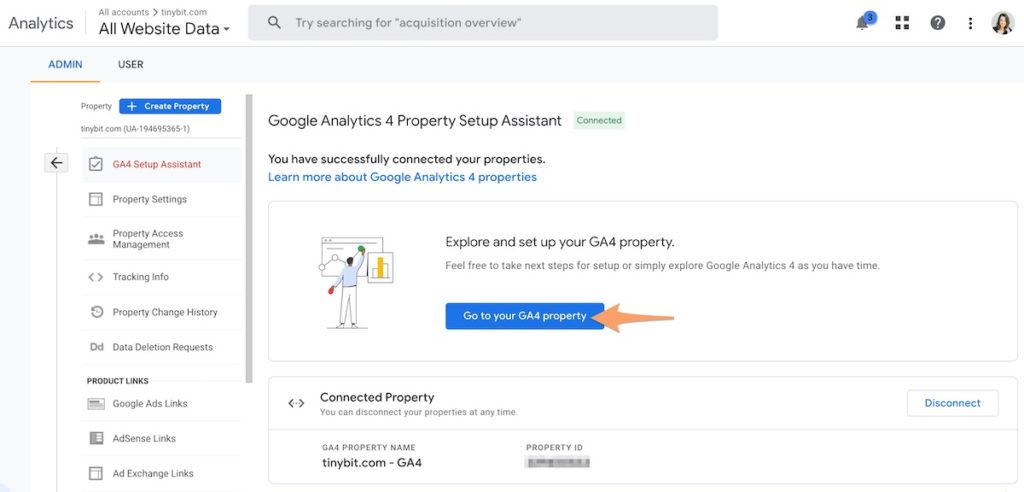
Your site should have still been added as a Data Stream. To verify, click the Go to your GA4 property button.
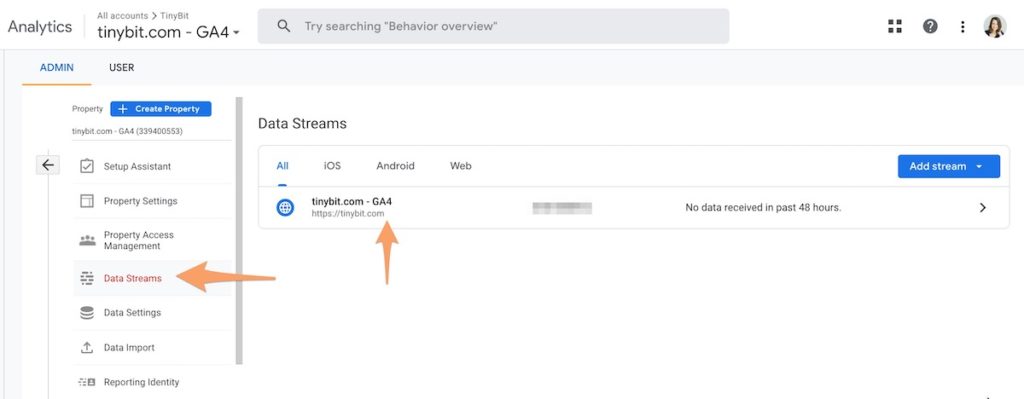
Then click Data Streams to verify your site has been added.
Creating a New Google Analytics Account with a GA4 Property
Now if you’re brand new to Google Analytics… you’re in the right place! Google Analytics is one of the most important tools for a food blogger to have in their tool belt, and you can set up your Google Analytics account and your GA4 property at the same time!
1. You’ll need a Gmail account in order to use Google Analytics. Both are free (unless you’re using Google Workspace and a custom domain like @foodbloggerpro.com), so that’s your first step if you don’t already have one. Be sure you’re logged into the correct Gmail account as well.
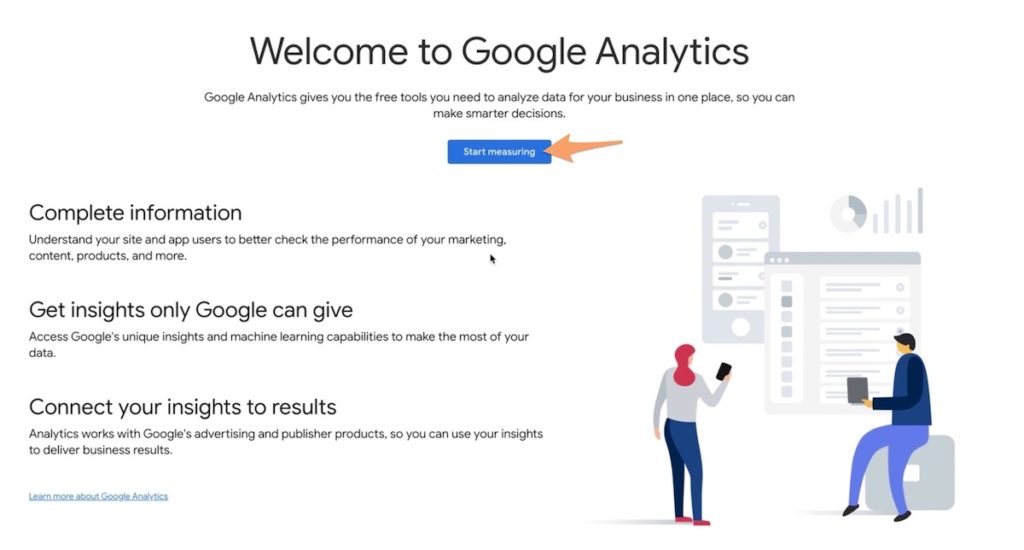
2. Go to analytics.google.com and click Start measuring.
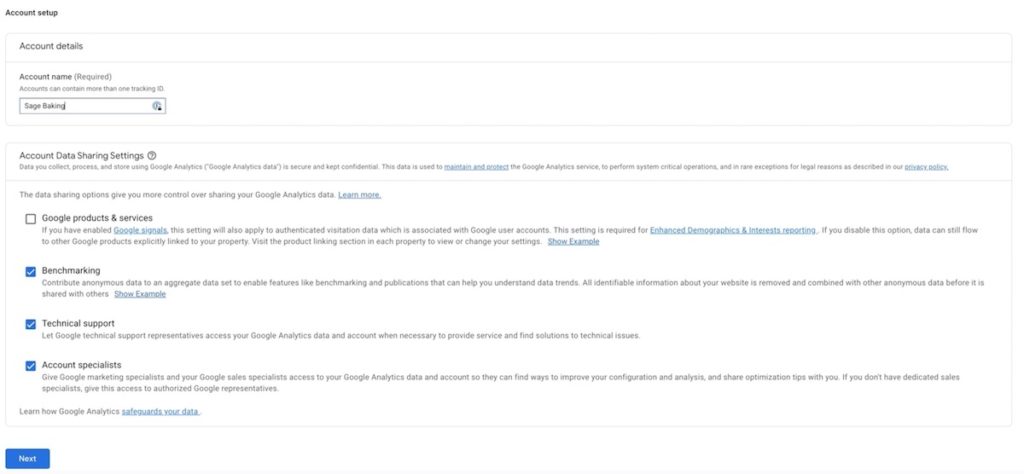
3. Type in an account name. This will be the name of your Google Analytics account. In this example, we’re just calling it Sage Baking, since that’s the blog name for this example. Feel free to review or change the data sharing options, and then click Next.
4. Next, enter a property name. This will be the name of your GA4 property. In this example, we’re calling it Sage Baking – GA4. Select your correct reporting time zone and currency, and then click Next.

Note: You can also create a Universal Analytics property by using the advanced options in this section, but it’s not recommended at this point in time since Universal Analytics will stop collecting data in July 2023.
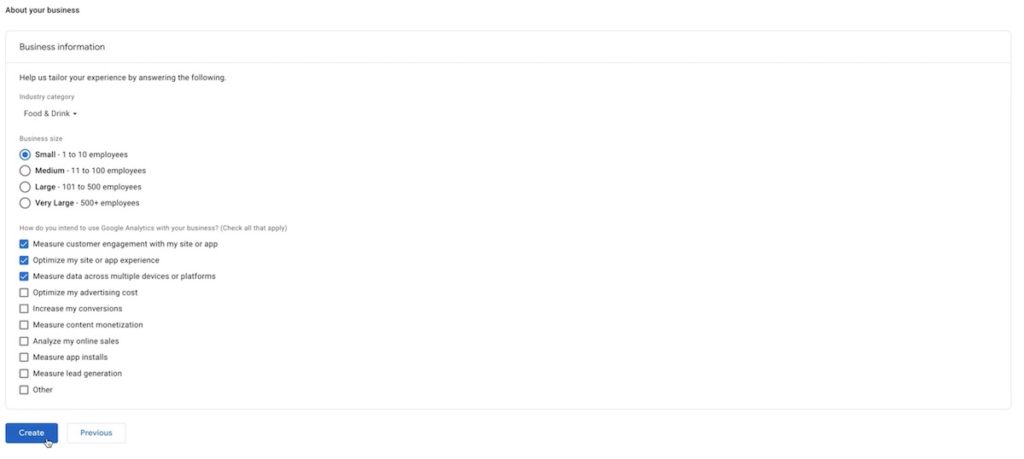
5. Finally, choose your industry category, business size, and share how you’ll use Google Analytics, and then click Create.
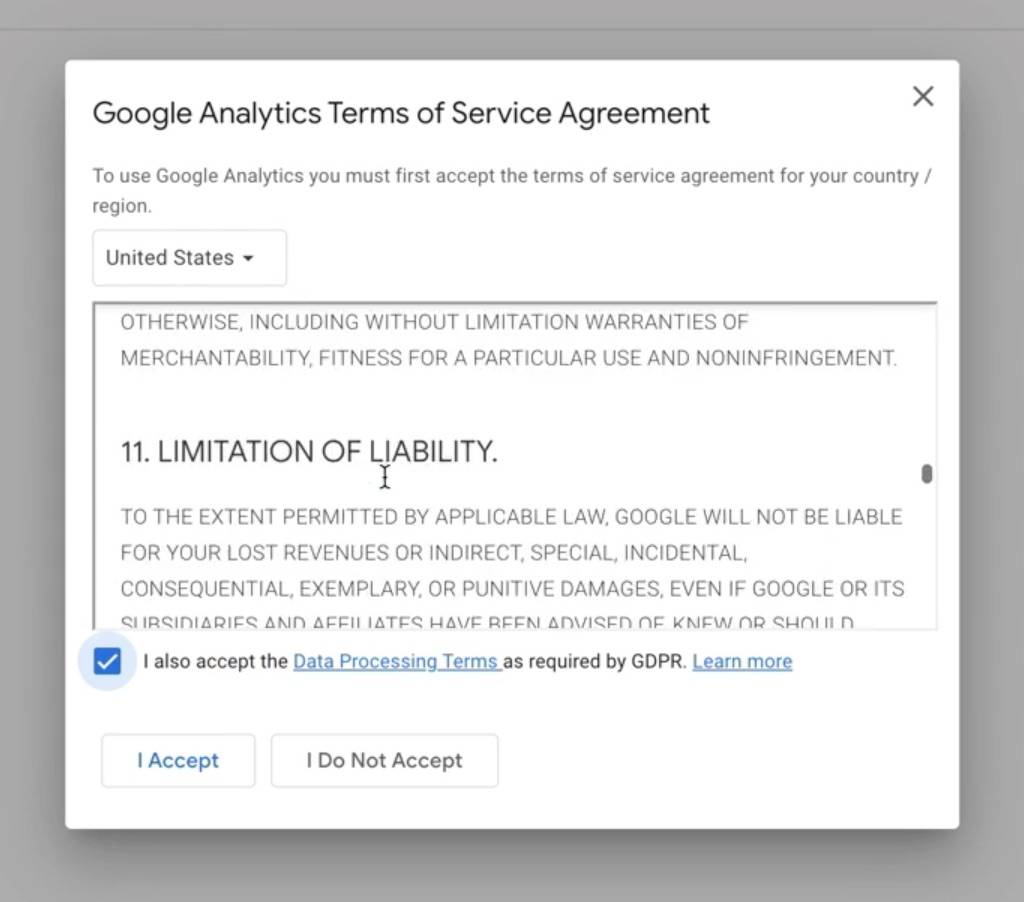
6. Review the terms of service and data processing terms and then click I Accept.
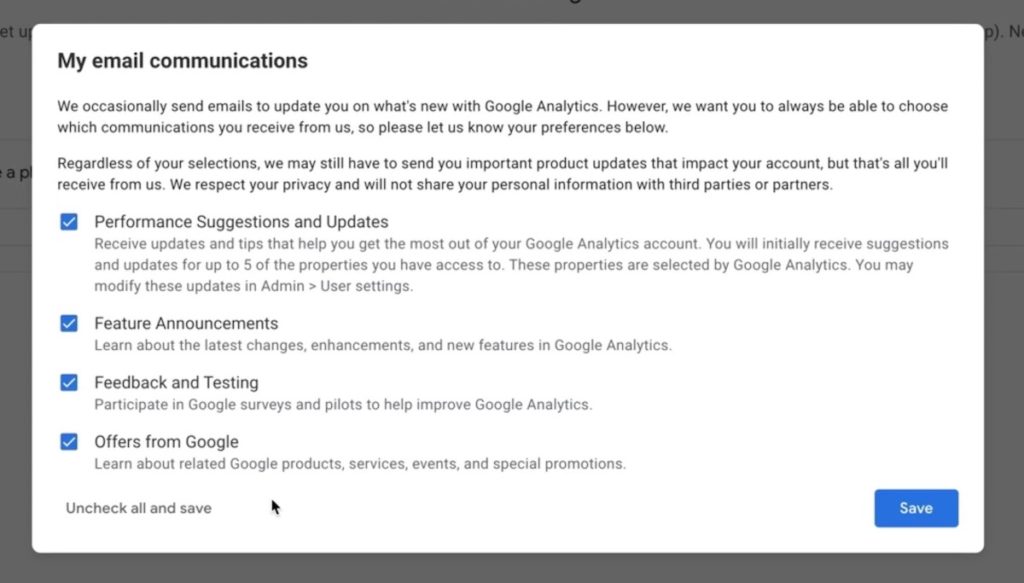
7. Customize your email communication preferences and click Save.
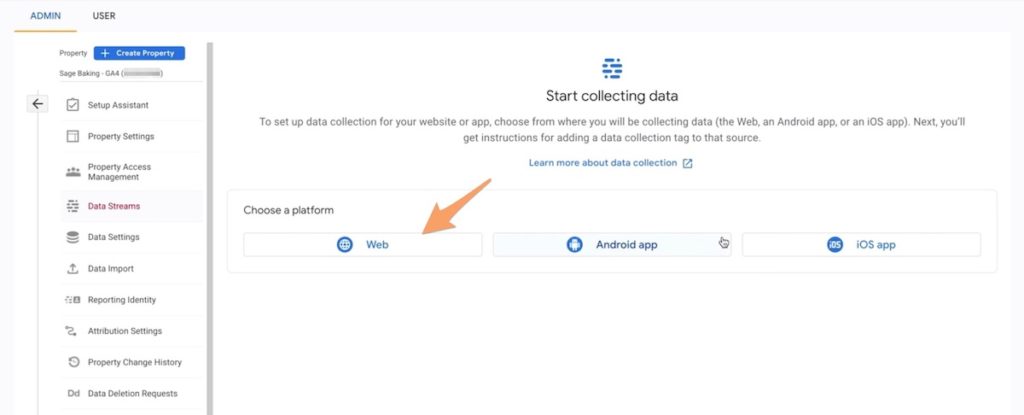
8. Yay! You’ve successfully created a Google Analytics account with a GA4 property! 🎉 Now, you need to add a data stream. Data streams are the places from which you’ll collect data. For most food bloggers, you’ll just need to set up a Web data stream for your website.
Under Choose a platform, click Web.
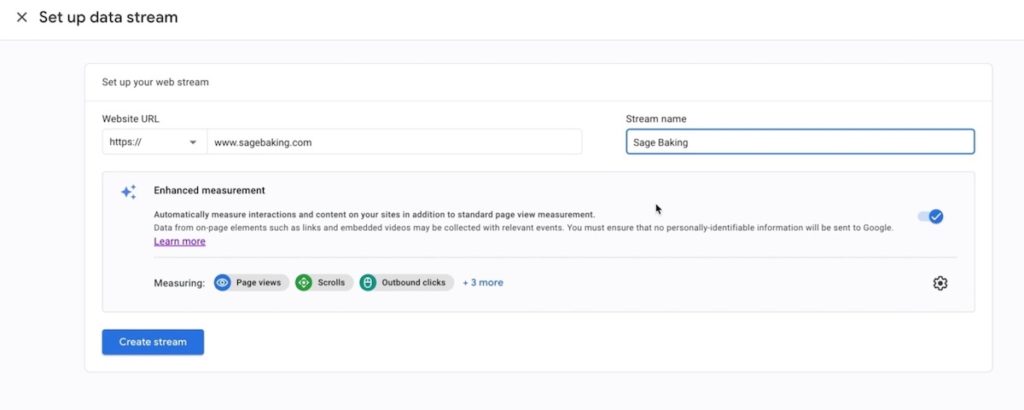
9. Add your website URL, and then give your web stream a name (again, we just used Sage Baking!). Keep the Enhanced Measurement toggle on, as it will help you collect event information about the way users interact with your content. Then click Create stream.
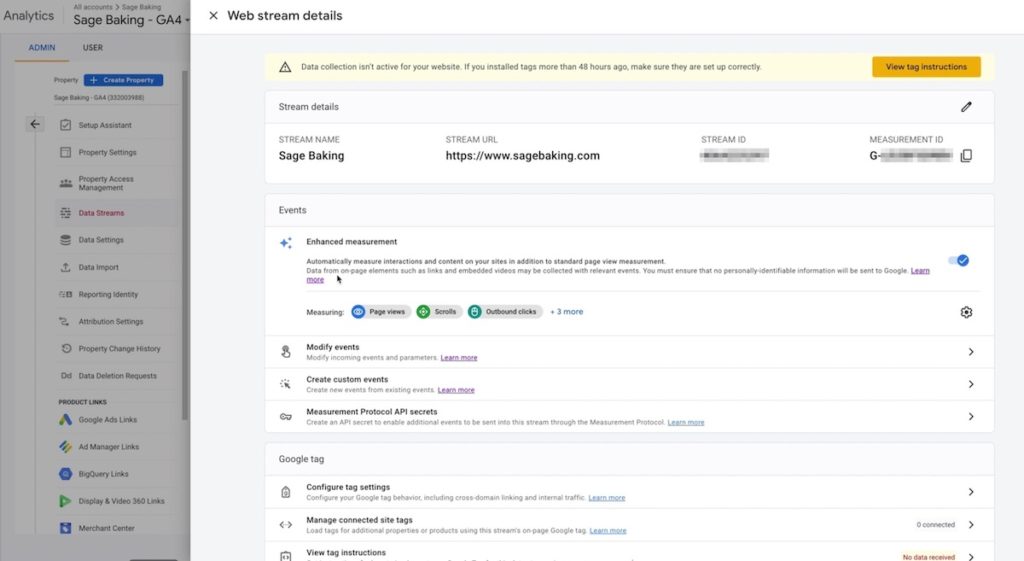
10. Your Data Stream has been created! You’ll see some information about your data stream including the name, URL, stream ID, measurement ID, and other settings you can customize.
At this point, whether you’re starting with an existing Google Analytics account or you’re creating an account from scratch, you officially have a GA4 property!
Now, if you still need to connect your GA4 property to your site (i.e. if you didn’t or couldn’t select “Enable data collection using your existing global site tag(s)” during the setup), be sure to check back tomorrow when we’ll walk you through that process.
Until then, great job getting to this point! If you have any questions, or if you’re interested in diving into the wild world of Google Analytics 4 right now, be sure to check out our brand new Google Analytics course, available exclusively for Food Blogger Pro members:

See ya tomorrow for part 2 of this series where we’ll connect your GA4 property to your site! 👋
If you were successful in creating a brand new GA4 property, congrats! We’d love to hear from you in the comments. 😊 Have questions? Leave them below or jump into the Food Blogger Pro forums!
Hi, the only data stream showing for me is http:// Shouldn’t my https:// be there?
Hey, Colleen!
I see you’re an active FBP member — would you be up for posting this question in the forum and including some information about how you’ve started setting up your GA4 property? That way, we can loop in some members of our team or our FBP experts so they can help you out!
Thank you for this helpful article!
Under “I want to create a new Google Analytics 4 property” it says You do not have editor permissions. Contact your account admin”. But, I am the account admin. Do you know what this means?
Thank you so much!
Hey, Jenna!
I see you’re an active FBP member — would you be up for posting this question in the forum? That way, we can loop in our Google Analytics Expert to help you out!
Yes, I can do that! 🙂