Lighting is one of the most important aspects of food photography. While natural light is often considered the ‘holy grail’ when it comes to food photography, it is unpredictable. You can’t control the weather, the clouds, or the sunlight, so while natural light produces some beautiful photos, reliable natural light for the length of your shoot can be hard to come by.
Artificial lighting gives you flexibility, control, and consistency that you just can’t get when you’re working with and relying on… the sun! Particularly if you are photographing in the winter, on nights and weekends, live in a cloudy or rainy climate, or live someplace without many windows, artificial lighting is a necessity when it comes to food photography.
One of the biggest barriers to getting started with artificial lighting is the equipment. Which artificial lights are the best? Are there any affordable options? What other materials do you need? Curious to answer these questions and learn more about choosing the best artificial lights for food photography? We’re breaking it all down below!
How to choose LED panels for artificial lighting
There are two main kinds of artificial lights: continuous and strobe (or flash). For the purposes of this post, we’re going to focus on continuous light because it’s the most similar to natural light. It means that you’ll have a light on continuously throughout the shoot. It’s like turning a light switch, but unlike an overhead light in your home, an artificial continuous light setup gives you a bit more control in terms of light quality and direction.
There are countless varieties of continuous lights, but our favorite for food photography is an LED panel. LED panels are available in a variety of sizes and budgets (you can search for “LED light panels for photography or video” to compare options) — so how do you choose?
What specifications should you look for when choosing an artificial light?
- Daylight balanced (5200-5600K) — this gives the light a more ‘natural’ quality.
- Brightness — get the brightest panel that fits within your budget (660W is ideal).
- CRI (Color Rendering Index) Rating of 90+ — this is an indicator of quality (no flickering!) and how well the light will render the true quality of the object you’re photographing.
One of our go-to options is the Neewer LED Light Panel. They are easily broken down for storage (convenient!) and are dimmable. You can also change the temperature of the light which is a nice customizable option to have. The Godox Godox SL150W II LED Video Light and the MOUNTDOG Softbox Lighting Kit are two additional options, depending on your budget and preferences!
Food Blogger Pro members! We have a whole course about Artificial Lighting for Food Photography!Additional equipment for artificial lighting
Now that you’re prepared to purchase the “lighting” portion of your artificial lighting setup, what else do you need? There are a few other tools that will make photographing with artificial lighting easier and more successful.
Tripod
When you’re shooting with artificial light, which isn’t nearly as bright as the sun, you’ll need to slow down your shutter speed. If you’re holding the camera in your hands at these lower shutter speeds, the camera will pick-up on your shaking hands and you’ll end up with blurry images.
An easy fix? A tripod! This tripod is a good budget option and this tripod comes highly recommended by Food Blogger Pro members.
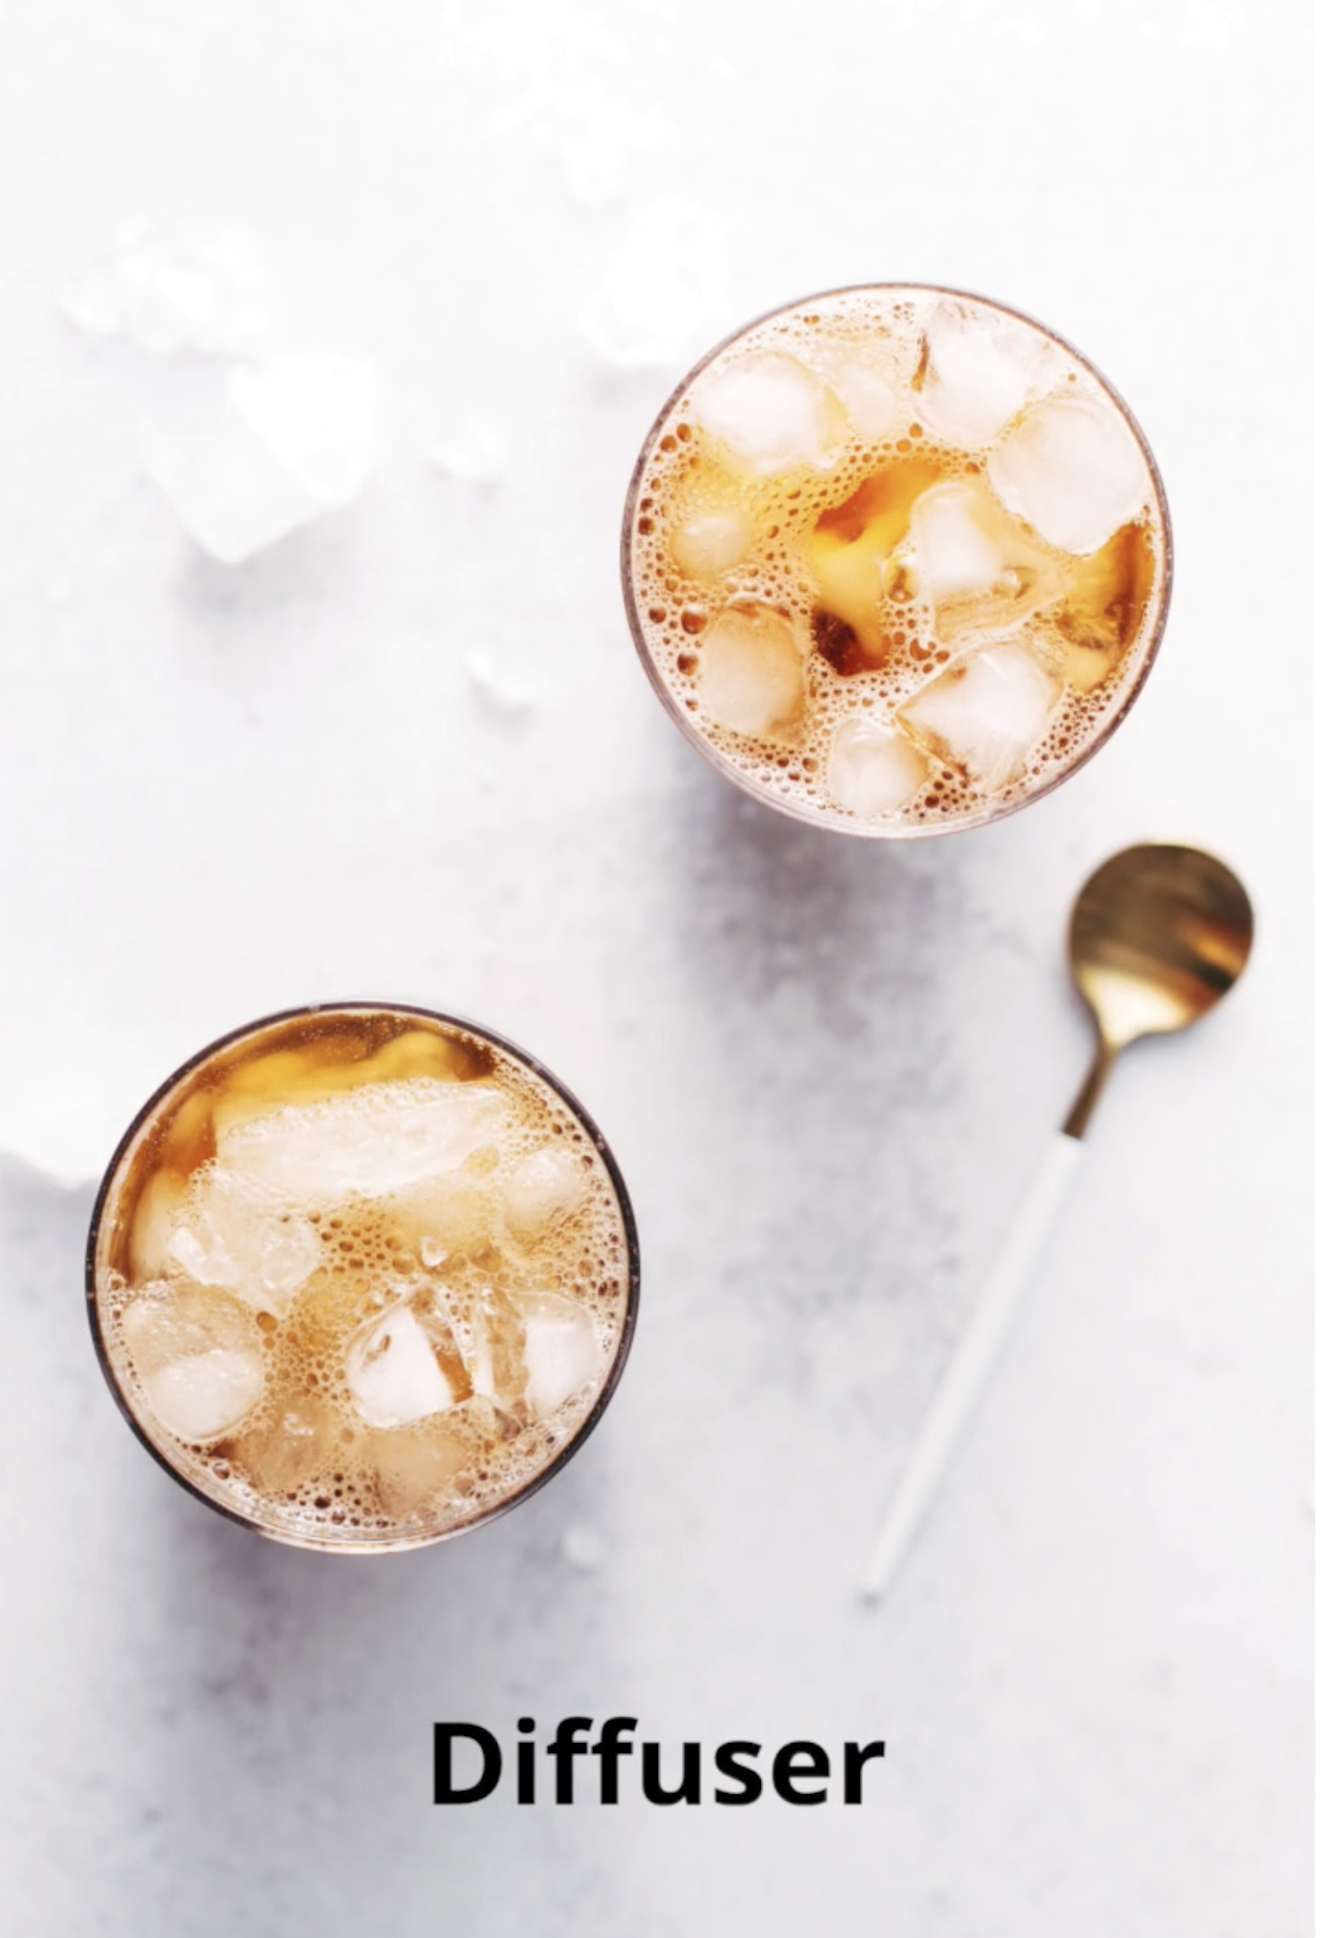
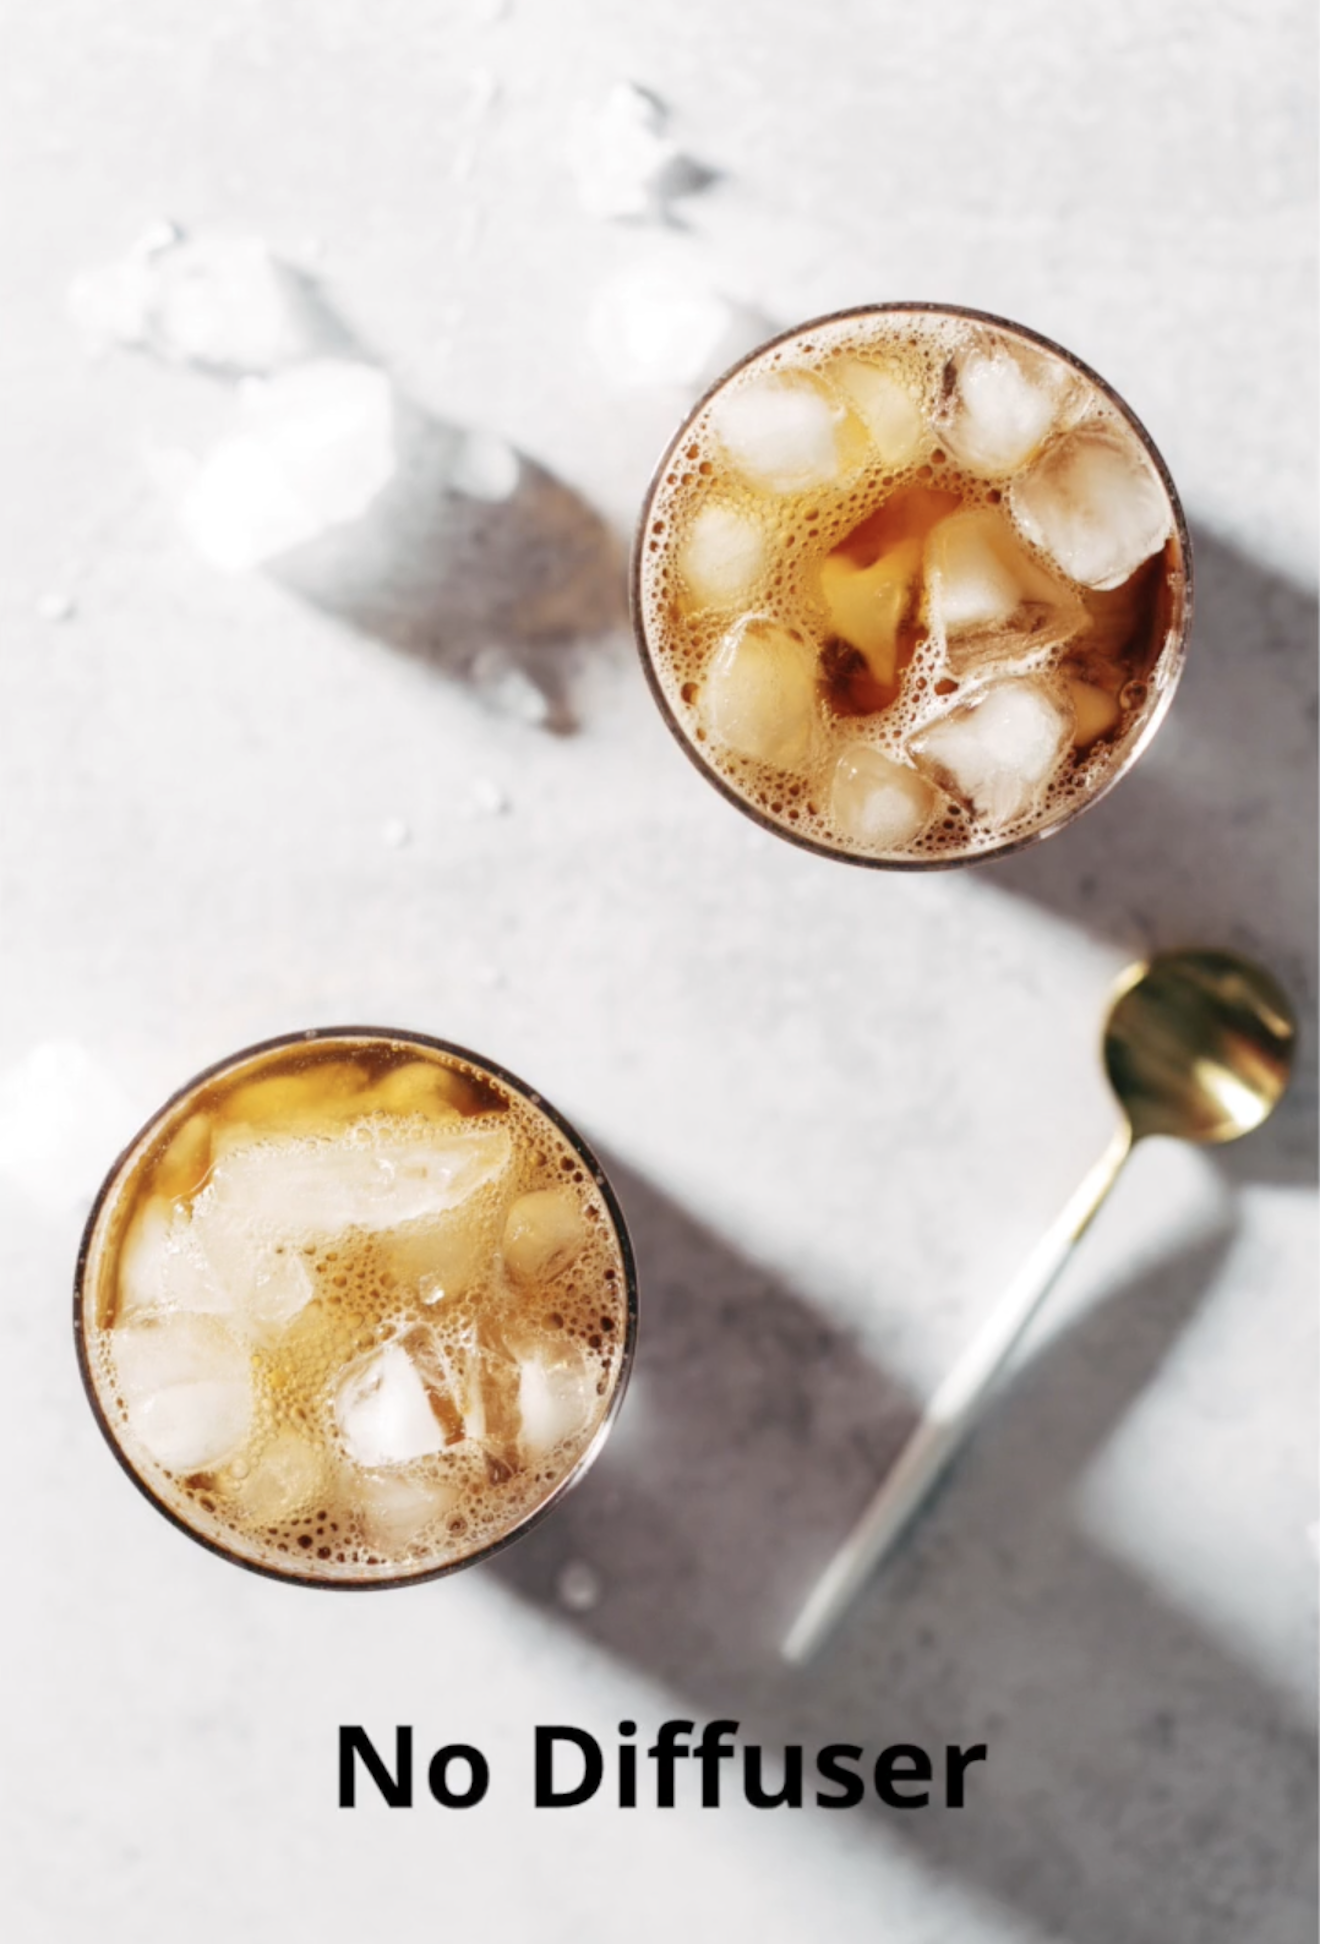
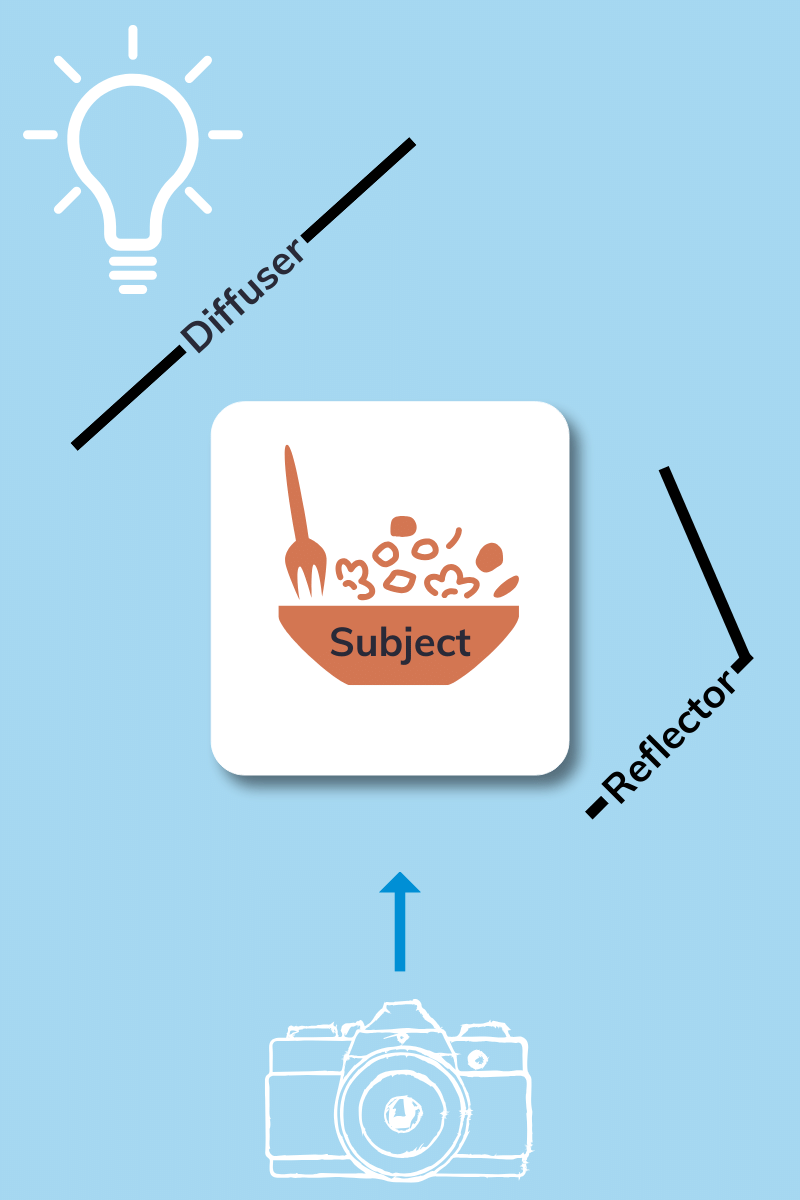
Diffuser
Diffusers are essential when using artificial light. They are positioned in-between your light source and your subject matter (aka your soup, bread, cupcakes, or whatever you’re shooting). Diffusers take the small light source from your LED panel and diffuse it into a big, soft light source that’s more reminiscent of the sunlight you get through your windows.
You’ll want to experiment with the distance between the light source and the diffuser to see what works best for your photograph style. A simple rule of them is the farther the diffuser is from the light, the softer the light will be.
Some of the most popular diffusers for artificial lighting are the NEEWER 40″x60″/100x150cm Light Reflectors.
Reflector
A reflector, or bounce card, is positioned opposite from your light source to… reflect (!) light back onto your subject matter. This helps to fill in any shadows or dark areas of your image and provide a more uniform lighting.
Reflectors can be very simple — a piece of white foam board works perfectly!
How to use artificial lighting for food photography
Once you’ve pieced together your equipment and set-up for artificial lighting, a few simple tips and tricks will help improve the quality of your photography right from the start.
- Continuous artificial light is not bright enough to block any other ambient light. Close your window curtains and turn off overhead lights to block out other lights that might affect the white balance of your photographs. The only light should be from artificial continuous light.
- Position the light source behind or to the side of your food just as you would with window lighting
- Use black cards to absorb light and create deeper shadows for higher contrast in your images.
- Adjust the height of the artificial lights to control how the light falls across your food.
- Experiment with changing the temperature of the light source.
As with all new skills in food blogging, there will be a learning curve with artificial lighting in food photography. But it’s an incredibly valuable skill to have that will give you invaluable flexibility and opportunities for creativity.
Looking for additional resources for artificial lighting? We love the artificial lighting resources from The Bite Shot and Two Loves Studio.
Do you use artificial lighting for your food photography? Any favorite tips or products to share?
One of my favorite artifical lights for my food blog is the godox V1 flash it’s super powerful and the quality of light is perfect for food shots!
Thanks so much for sharing!
Thanks so much for sharing!
Thanks for reading!
This post was super helpful! I’ve been struggling with getting my food photos just right, and the tips on choosing artificial lights were exactly what I needed. I didn’t realize how much of a difference the right lighting could make. Excited to try some of these recommendations out!
So happy to hear you found this post helpful! Keep us posted on what you end up trying!