One of the most common questions we get from food bloggers is something along the lines of, “How big should the images on my site be?”
It’s not too surprising –– you know that phrase, “You eat with your eyes”? Great photos are an essential part of any successful food blog, so it makes sense that bloggers are concerned with making sure that the photos on their sites are on their sites are the right size for their posts, Google, and site speed.
Image size may seem like a simple enough topic, but it’s actually a bit more nuanced than you may think!
So let’s dive into the beautiful world of food photo sizing.
Why should you care about photo size?
Food blogs are typically pretty photo-heavy –– we want to show off the textures, colors, and experience of our recipes through the photos we add to our blog posts. Photos are great for readers, as they’ll know what to expect if they make the recipe, and you can easily share your photos on social media to help you get even more readers to your site.
That said, you want to make sure that your images aren’t too big or too small –– either case will create issues for your readers, your site speed, and search results.
And an important distinction before we unpack that, when we say “image size,” we’re talking about:
- The file size –– in kb (i.e. 700kb)
- The dimensions –– in pixels (i.e. 600px X 900px –– where the first number is the width and the second is the height)
Images that are too big
Let’s talk about images that are too big in file size first.
You know when your internet is slow and every site you try to visit takes for-ev-er to load? Super frustrating, right?
Your readers may have a slower internet connection than you, and if your image file size is too big, it’s going to require more resources to load when someone visits your site. Add in the other elements that are trying to load on your site –– like ads, your text, your theme, your colors, and your fonts –– and it can take a really long time to fully load your page!
47% of readers across the web expect a page to load in 2 seconds or less, and 40% of people leave a website that takes more than 3 seconds to load, so it’s incredibly important to do what you can in order to decrease your site loading times –– paying attention to image file size is an easy way to do that!
Now let’s talk about images that are too large dimension-wise.
The dimensions of your image can impact the file size of that image; if you’re exporting an image from your editing program that’s 3000px X 4500px, your file size will most likely be much larger than an image that’s exported at 1200px X 1800px.
Images that are too small
Lucky news: an image that has a small file size is actually a good thing. Faster is always better, and images that have small file sizes will load faster than those with larger file sizes.
Images that are exported with dimensions that are too small is the issue here. And to understand that, it’s important to first understand the content width of your blog posts.
When you think of a food blog post, it typically looks like this:

We have a menu bar on top, the content area on one side, and then a sidebar on the other.
That orange chunk –– the content area –– is what we’re talking about right now. That’s where your post, your recipe, and you photos go. Here’s what that looks like on our food blog, Pinch of Yum:

Content area widths differ from theme to theme, but most content widths are anywhere from 600px – 800px, meaning that there are that many pixels to fill width-wise in your blog post.
Typically, you’ll want images to fill that content area, so if your image dimensions are too small, it’ll leave some unwanted white space around your photo.
Not only that, but a lot of screens these days are 4K or retina-ready, meaning that they show twice as many pixels per pixel on the screen in order to deliver crisp, high-quality photos to their users.
If you upload an image that’s only the width of your content area or lower, your image will appear grainy, blurry, and unfocused on those retina screens because they’re expecting more pixels (or a larger image) in that area on the screen.
So we’re after the “Goldilocks” of a food photo –– one that’s not so big that it slows down our sites, but not too small so it still looks nice and crisp.
WordPress and Image srcset
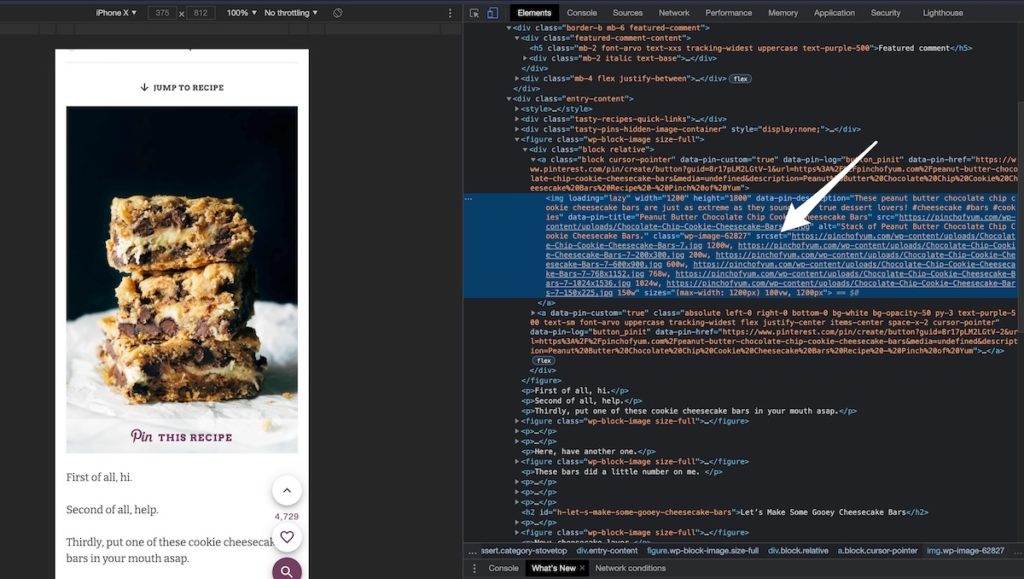
If you’re a WordPress user, your theme will most likely utilize an image attribute called srcset, which helps make your images more responsive.
When you upload an image to WordPress, your site actually creates a bunch of different-sized versions of that image (called thumbnails) for use in different places in your theme.
srcset helps serve the correct image size for the device your reader is using. If your reader is reading your post on an iPhone, there’s no need for your website to serve a giant 1200px image when the screen is only 1125px wide (and when your content width is much smaller than that!).
On Pinch of Yum, srcset creates versions of the same image for screens that are 1200px wide, 200px wide, 600px wide, 768px wide, 1024px wide, and 150px wide:
This is a handy feature that optimizes your images for different devices, but there are still a few different ways that you can optimize your images even further to ensure they load efficiently and still look great.
How big should your images be?
The short answer –– A good rule of thumb is:
- Your image size should be in the 200kb to 300kb range.
- Your images should be 1200px wide (and however tall to maintain the correct aspect ratio).
The longer answer –– There are a lot of different components that impact the size of your images.
First, you need to start out with great photos. If you’re trying to optimize an image that’s too dark or grainy to begin with, no amount of image optimization will make them better.
Want to take better food photos?Once you have a great photo, it’s time to edit. When you’re editing your photos in Photoshop, Lightroom, or another editing software, there are a few different ways you can minimize the file size and optimize the dimensions of your images:
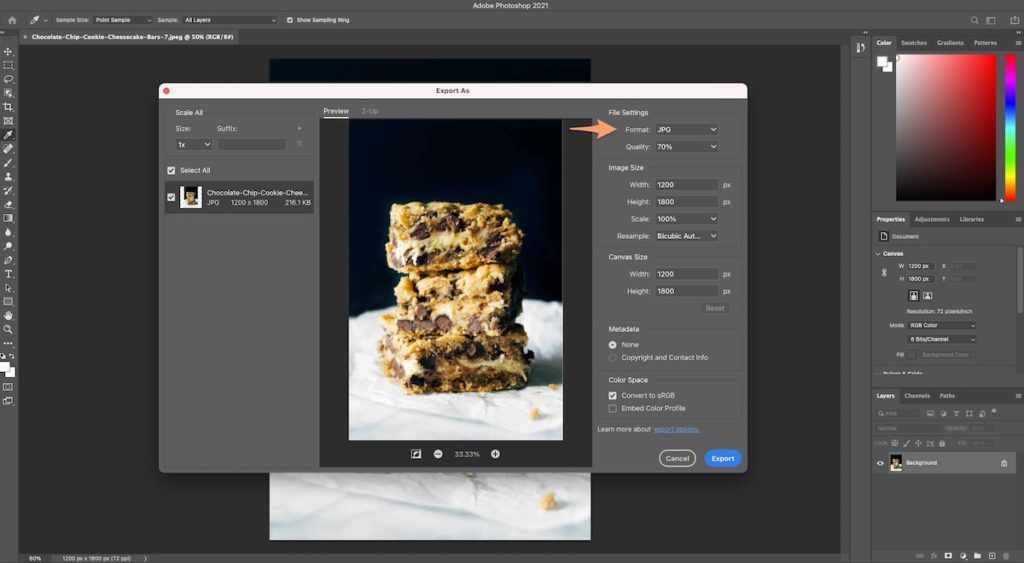
1. Export your image as a JPG
JPG photographs are usually a bit smaller than their PNG cousins, so you’re already reducing your file size by exporting all of your images in this file type!
Nerd Note 🤓: JPG is great for photos, and PNG is great for text, line art, drawings, and most logos.
2. Resize your photo to have a width of 1200px
When exporting your photo, you can set the export width to our recommended 1200px, and keep the height “locked” so that it’ll automatically adjust based on the aspect ratio of your image.
If you’re editing an image that’s 3000px X 4500px and you set the export width to 1200px, your editing program can automatically adjust the height to have the same aspect ratio as the original image, 2:3. So your final exported image will be 1200px X 1800px.

3. Adjust the quality setting
Not only can you adjust the height and width of your image, you can also adjust the export quality.
If your export quality is at 100%, that image will export at the largest image size it can for the image’s dimensions. It’ll also be the most crisp image you can export from your editing software.
That said, you can reduce the export quality to make your file size a bit smaller. Of course, reducing the export quality too much may have a negative impact on the look of your image, but you may find that there isn’t a huge visual difference between exporting the image at 70% quality and 100% quality.

We recommend experimenting here and seeing what works for your photo style. Once you find a quality that works for your style, you typically won’t need to change it moving forward.
4. Keep an eye on the file size
After your image is exported with 1200px width and at a decreased quality, check the file size. Is it in the 200kb to 300kb range?
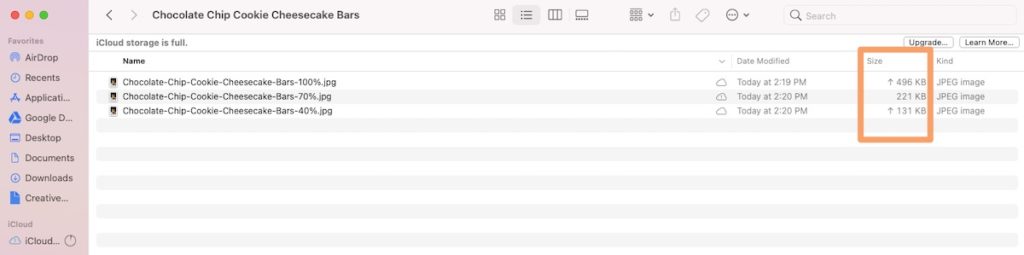
It may not be! And that’s because whatever is in the image itself can also impact the file size.
If your photo has a ton of texture and detail, it might need to be exported at a higher quality in order to look its best. And as we know, higher quality = larger file size.
So the tl;dr here is to find a quality setting that results in files sizes in the 200kb to 300kb range, as it’ll work for most of your photos, but definitely keep photo quality in mind and adjust as necessary in those one-off instances.
5. Use a compression plugin on your site
Last but not least, you can compress your images after they’ve been optimized! We like, use, and recommend a plugin called ShortPixel for that.
There are two really compelling reasons to use a compression plugin on your site:
- They use custom algorithms that help reduce the image size significantly more than the ways we chatted about above.
- They optimize all of the thumbnails that WordPress automatically generates (aka. those other sizes of the same image!).
If you’re a Food Blogger Pro member, you can head on over to our course that walks you through setting up and using this plugin.
Putting it All Together
Now, I know you may be saying, “Okay, Alexa, this is all fine and dandy. But you’ve just given me a lot of information to digest, and I need a quick checklist to help me make it all happen!”
Your wish is my command. Download this free PDF and keep it handy whenever you’re editing and uploading images for your blog posts!
Now we’re excited to hear from you: Is there anything that surprised you about image sizing? Anything you still have a question about? Let us know in the comments below!
Great article! I was just looking for info on image size to use on a blog, since the default image resizing and thumbnail generating function of WP or my template produced blurry results.
I didn’t notice this for quite a while so now I have to go and replace quite a bunch of images…
We’re so glad you enjoyed the article, Matej! Knowing the correct image size can be really tricky, so it can be so helpful to have a set of guidelines to follow.
You’ve got this — let us know if you have any questions as you’re updating images!
Thank you so much for the helpful guide! When it comes to all the generated thumbnails, are all the sizes being used on the Pinch of Yum website? Should we only allow the sizes being used to be generated to keep the database from getting too big? Thank you! 🙂
Good question! I checked in with the POY team and they said that since they have a custom theme, they probably have fewer thumbnails being generated than other themes that are designed to be more flexible.
What theme are you using for your blog? It might be best to reach out to their support team to get their thoughts on this!
Thanks so much for this article! It’s a big help to new bloggers just starting out. I appreciate the heads up!
We’re so glad to hear you found the article helpful, Debi! 😊
Thank you for the info on this! One question: what should the resolution be for exporting from Lightroom or Capture One?
I’ve been exporting at 240 pixel per inch (based on some info I got years ago). Is this still what I should be doing?
Good question, MJ!
Since you’re a FBP member, I’d recommend checking out this lesson from our Editing in Lightroom course. Lindsay talks there about the specific export settings you should use when exporting in Lightroom.
I hope that helps!
Thank you for this article! It’s given me useful guidelines for the images I use in my post content. I’m just wondering though, do these guidelines also apply to the image I use for my recipe plugin, or should these be different?
Hi Ben,
I’d definitely recommend checking out this blog post about how to optimize the rich results image of your recipe posts!
It goes over the size and ratio you should aim for with your images, some design elements to keep in mind when shooting photos, and more. I hope that helps!
Hi I’m trying to understand how to optimize my images properly. Why does it need to be 1200×1800 if the content width of my theme is smaller? I’m trying to load my pictures and they are looking blurry at the size.
Hey, Bobbie! Great question. Are you saying that your photos are blurry if you upload them at 1200 x 1800? Reason I’m asking is because they *shouldn’t* look blurry if your content area is smaller than that.
Here’s a quote from the article above:
“Typically, you’ll want images to fill that content area, so if your image dimensions are too small, it’ll leave some unwanted white space around your photo.
Not only that, but a lot of screens these days are 4K or retina-ready, meaning that they show twice as many pixels per pixel on the screen in order to deliver crisp, high-quality photos to their users.
If you upload an image that’s only the width of your content area or lower, your image will appear grainy, blurry, and unfocused on those retina screens because they’re expecting more pixels (or a larger image) in that area on the screen.”
If your content area is 600px wide, you’ll want to upload a larger photo to both:
1. Fill that content area
2. Make your photo appear crisp on 4k/retina screens.
Does that make sense?
Thank you for your help! As I was reading your post I realized I might have too many optimizers due to other plug-ins installed. I need to evaluate my plug-ins. I had short pixels but another pligin required a different optimizer. Anyway, thanks! Great information.
We’re so glad you enjoyed the post, Zoe! And what a great catch. You definitely want to make sure you don’t have several plugins doing the same thing — simple is better when it comes to optimizing your plugins. 🙂
I am so so confused about this….. all my images on the homepage a different sizes no idea where to change them and how to change them and what size they should be ….it is all so confusing I am ready to just give up this blogging !
One image is sure the other rectangle and another just enormous 🥴
Hi, Hanna! In this post, we talk about photo sizes for blog posts, not homepages. So in your case, we’re talking about the photos that show up in posts like these. 🙂 Don’t get discouraged! You’ve got this!
Since things move at the speed of smell in the food blogging world, would you mind advising me whether the sizes listed are still relevant?
Great article. My question is what size to shoot or export the photos so that they are the same shape and size on the home page. I use Kale with three photos on the content page and it’s a challenge making them the same size.
Hi Kelli! Have you tried adjusting the width of the images to 1200 pixels? More directions here. Let me know if that doesn’t make sense!
hi, so when I’m ready to save my photos in LrC, I get this message from LrC, saying: if an image cannot meet the limit (I marked limit the size to 250kb) then it will be exported to the minimum possible file size.
Did you ever see this message from LrC during saving image? I can continue or cancel the export and change the settings. I only have seen this prompt when limiting the size
Thanks
Hi Sylvia! Great question. When we export photos from LrC, we set the shortest side dimensions to be 1200 pixels and then play around with Quality % until the exported photo is between 200-300kb. Does that make sense? It should help you avoid the error message!
Thank you for this valuable information! I have discovered the importance of image optimization in my new blogging journey, and it can certainly be a little confusing for newcomers. I use WordPress, and what I am having difficulty with is figuring out how to properly resize images for the site. I use SiteGround for hosting, and I have their Speed Optimizer enabled with is supposed to compress images. I have tried using Canva for resizing, but the finished images always tend to be larger in size than the originals! (400 kb to 2 mb) Is there any concise, detailed tutorial online available that FBP offers or that you know of that goes into this subject? How do new bloggers usually familiarize themselves with image optimization? Any direction you can give me would be so appreciated! Thank you for your valuable time and help!
Hi Pio! Are you a FBP member? We have a course lesson all about this!
Great insights on photo sizing! I never realized how much the dimensions could impact the overall look of my food blog. Can’t wait to experiment with the recommended sizes for my recipes. Thanks for sharing!
Happy you found it helpful!
Great insights! I never realized how much the photo size could impact engagement. I’ll definitely be adjusting my images to optimize for my food blog. Thanks for sharing these tips!
Happy to hear you found this article insightful!